
As I pulled open the door to my kitchen, the inviting aroma of garlic mixed with melting cheese danced in the air, instantly transporting me to a cozy Korean street market. Today, I’m sharing my take on the beloved Korean Corn Cheese—an indulgent yet surprisingly easy dish that’s bound to win over every palate at your table. This gluten-free delight not only whips up in just 30 minutes, but it also doubles as a perfect crowd-pleaser for any gathering. Combining sweet corn, creamy cheese, and a hint of garlic, each bite is a warm hug for your taste buds. Curious how to make this comforting dish a star at your next meal? Let’s dive into the recipe!
Why Is Korean Corn Cheese So Irresistible?
Creamy and satisfying, this Korean Corn Cheese brings together sweet corn with a rich blend of mayo and cream cheese for a dish that’s both indulgent and comforting. Quick to prepare, it takes just 10 minutes of prep and 20 minutes in the oven—perfect for busy weeks! Versatile for any occasion, it’s a delightful appetizer or side dish that pairs beautifully with grilled meats or as a party snack. Gluten-free and packed with flavor, it’s a crowd-pleaser that everyone can enjoy. Don’t miss out on this delicious way to elevate your home cooking.
Korean Corn Cheese Ingredients
Discover the magic of Korean Corn Cheese with these simple ingredients!
For the Mixture
- Sweet corn – Use 2 cups of canned or frozen corn to bring a burst of sweetness to the dish.
- Shredded mozzarella cheese – 1 cup adds the gooey, cheesy goodness that melts beautifully.
- Mayonnaise – ½ cup helps achieve a creamy texture that complements the corn perfectly.
- Cream cheese – ¼ cup softened cream cheese adds richness and depth to the overall flavor.
- Sugar – 1 tablespoon balances the savory notes with a hint of sweetness.
- Minced garlic – 1 tablespoon brings a lovely aromatic kick that elevates the comfort food experience.
- Green onions – 2 chopped green onions add freshness and a pop of color to your dish.
- Salt – ¼ teaspoon enhances all the flavors, making each bite irresistible.
- Black pepper – ¼ teaspoon brings a subtle warmth to the mix.
For Optional Toppings
- Sliced jalapeños – For those who love a bit of heat, these add a spicy kick.
- Additional cheese – Sprinkle more shredded mozzarella or parmesan on top for an extra cheesy layer.
Unleash the comfort of this delightful Korean Corn Cheese and watch it become a favorite at your table!
Step‑by‑Step Instructions for Korean Corn Cheese
Step 1: Preheat the Oven
Begin by preheating your oven to 375°F (190°C). This temperature is perfect for creating that bubbly, golden cheese crust we all love. While the oven is warming up, gather your ingredients to make the preparation smoother.
Step 2: Prepare the Corn
If you're using canned corn for your Korean Corn Cheese, open the can, drain, and rinse it well to remove excess salt. For frozen corn, place it in a bowl and let it thaw for a few minutes. This ensures a consistent texture in the final dish, allowing the sweetness of the corn to shine.
Step 3: Mix the Ingredients
In a large mixing bowl, combine the sweet corn, shredded mozzarella cheese, mayonnaise, softened cream cheese, sugar, minced garlic, chopped green onions, salt, and black pepper. Using a spatula, stir the mixture thoroughly until all ingredients are well incorporated, creating a creamy consistency that invites excitement!
Step 4: Transfer to Baking Dish
Pour the creamy corn mixture into a baking dish, spreading it out evenly with your spatula. This step is crucial for ensuring that every part of your Korean Corn Cheese bakes uniformly, allowing all the flavors to meld beautifully during cooking.
Step 5: Add Extra Cheese
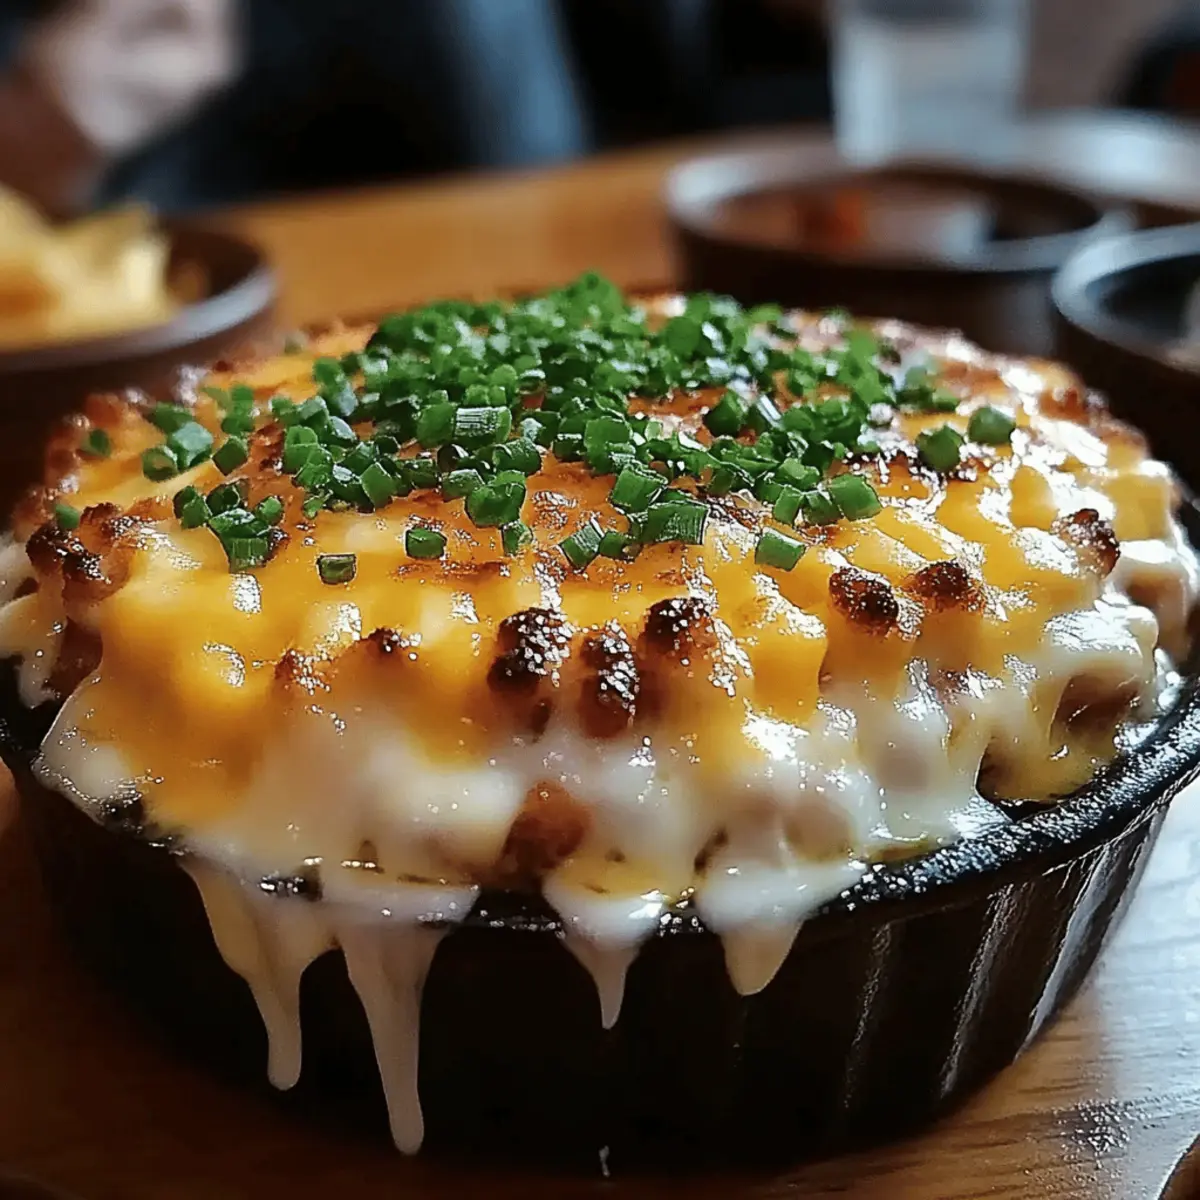
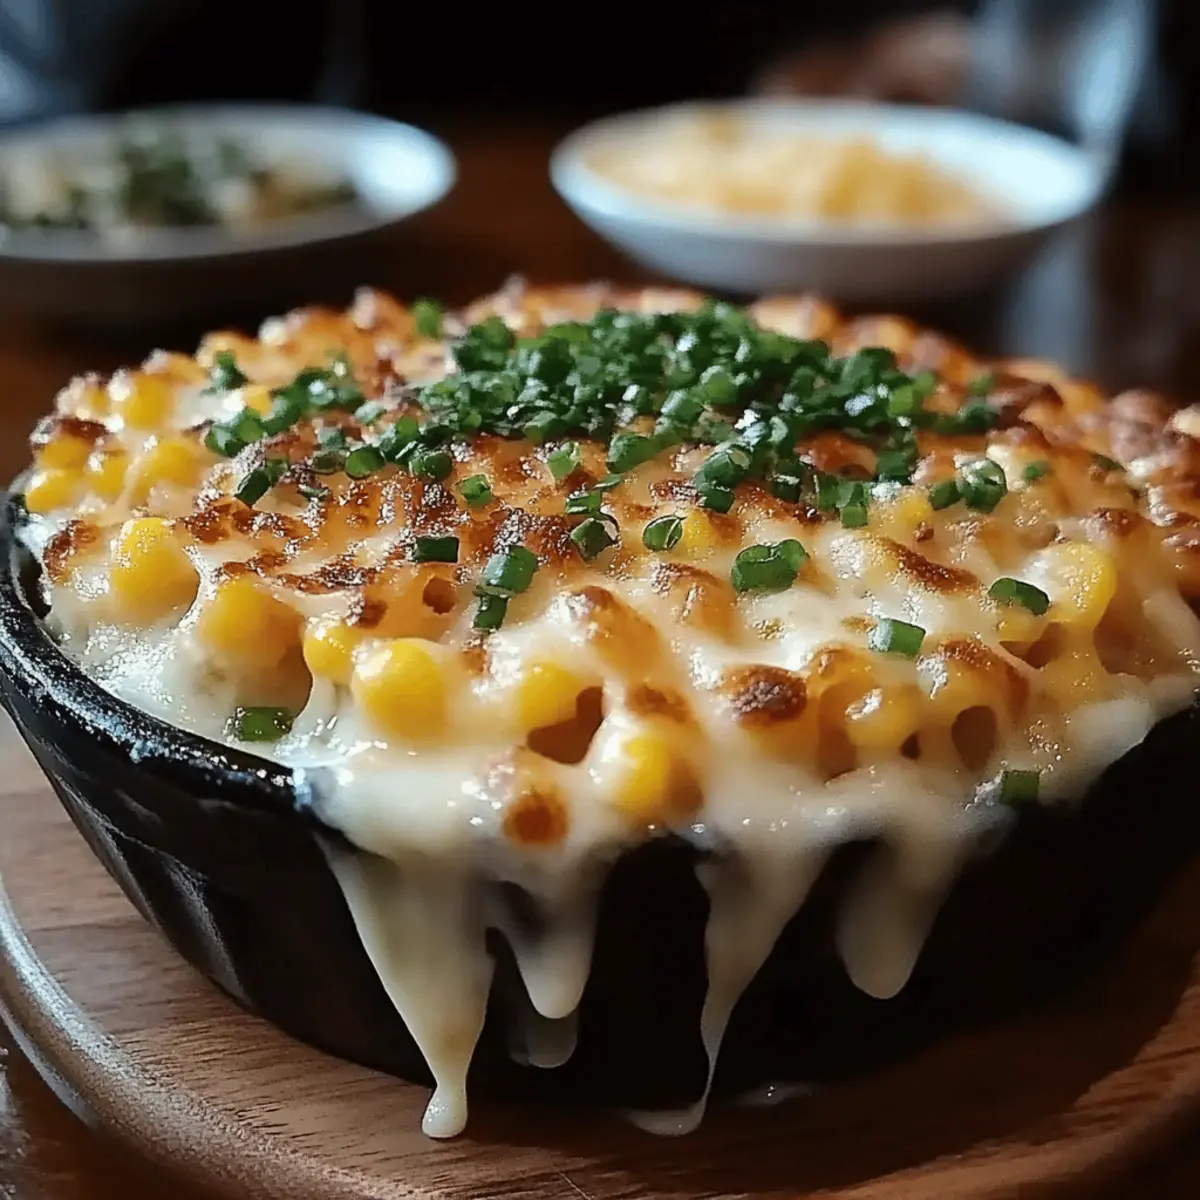
For that extra cheesy finish, optionally sprinkle more shredded mozzarella or some parmesan cheese over the top of your mixture. This will create a delightful golden crust as it bakes, making your Korean Corn Cheese even more appetizing and irresistible.
Step 6: Bake in the Oven
Carefully place the baking dish into your preheated oven and bake for 15-20 minutes. Keep an eye on the dish; it’s ready when the cheese is bubbling and turns a lovely golden brown color, filling your kitchen with its delightful aroma.
Step 7: Cool Before Serving
Once baked, remove the dish from the oven and allow it to cool for a few minutes. This not only ensures safe serving temperatures but also allows the flavors to settle and intensify, making each bite of your Korean Corn Cheese a burst of deliciousness.
Step 8: Garnish and Enjoy
For an added touch of flavor, garnish your Korean Corn Cheese with chopped green onions or sliced jalapeños. This final step enhances the presentation and brings a bit of freshness and spice, inviting everyone to dig in as soon as it’s served!

Korean Corn Cheese Variations
Feel free to customize your Korean Corn Cheese to match your taste and dietary preferences for an even more delightful experience!
- Spicy Twist: Add sliced jalapeños and a pinch of cayenne pepper to the mixture for a zesty kick. This variation takes the comforting warmth and brings it to a whole new level of delicious heat.
- Cheddar Love: Swap out mozzarella for sharp cheddar cheese to introduce a bolder flavor profile. This cheese swap makes every bite ooze with a rich, savory taste that pairs perfectly with the sweetness of the corn.
- Vegan Option: Use vegan mayonnaise and dairy-free cream cheese for a vegan-friendly version. This keeps the indulgent taste without any animal products, so everyone can enjoy a comforting dish.
- Bacon Boost: Stir in crispy bacon bits for a smoky, meaty element. The crunchy texture combined with sweet corn and creamy cheese creates a symphony of flavors that will have everyone reaching for seconds.
- Herb Infusion: Add fresh chopped herbs like cilantro or parsley for a burst of freshness. Herbs not only elevate the aesthetic but also introduce a delightful aromatic experience, making your dish feel vibrant and lively.
- Roasted Garlic: Substitute fresh minced garlic with roasted garlic for a sweeter, softer flavor. This twist adds a gourmet touch, making your Korean Corn Cheese richer and more complex without much effort.
- Creamy Spinach: Fold in sautéed spinach for added nutrition and flavor. The leafy greens provide a lovely color contrast while boosting the dish's healthiness—perfect for those looking to sneak in some veggies!
- Onion Flare: Incorporate caramelized onions for a sweet, rich depth of flavor. Their golden sweetness complements the corn beautifully, making this variation an irresistible treat that lingers on the palate.
Each of these variations allows you to take your Korean Corn Cheese adventure further, making every gathering a little more memorable! Looking for more meal ideas? You might love pairing it with Grilled Chicken Skewers or serving it alongside a refreshing Cucumber Salad for a perfect balance!
How to Store and Freeze Korean Corn Cheese
Fridge: Store any leftover Korean Corn Cheese in an airtight container in the fridge for up to 3 days to maintain its creaminess and flavor.
Freezer: For longer storage, freeze the Korean Corn Cheese in a well-sealed container or heavy-duty freezer bag for up to 2 months. Thaw in the refrigerator before reheating.
Reheating: To reheat, microwave individual portions or bake in the oven at 350°F (175°C) until warmed through, about 15-20 minutes. Add a sprinkle of cheese on top for extra indulgence!
Room Temperature: Serve Korean Corn Cheese at room temperature for best taste, but don’t leave it out for more than 2 hours to ensure food safety.
Expert Tips for Korean Corn Cheese
- Choose Quality Corn: Opt for sweet corn that’s fresh, canned, or frozen to ensure maximum flavor; avoid corn with added preservatives.
- Double the Cheese: For a cheesier experience, don’t hesitate to pile on additional mozzarella or parmesan before baking, creating that irresistible crust.
- Mix Evenly: Stir the ingredients thoroughly to guarantee a perfect balance of flavors in every scoop of your Korean Corn Cheese.
- Bake Until Golden: Keep a close eye on the baking time; every oven varies, and you want that bubbling, golden finish without overcooking.
- Cool Before Serving: Allow a few minutes for cooling after baking; this helps the dish set, making it easier to serve and enjoy.
What to Serve with Korean Corn Cheese
Dive into a world of delightful pairings that elevate your Korean Corn Cheese experience.
-
Crispy Fried Chicken: This crunchy, savory favorite complements the creamy corn with its satisfying texture and flavor contrast.
-
Garlic Butter Rice: A fluffy, aromatic side that embraces the buttery essence of the corn cheese while providing a hearty base.
-
Fresh Green Salad: A vibrant mix of greens with a zesty vinaigrette ensures a refreshing balance against the rich cheesiness.
-
Kimchi: This spicy, fermented side adds a tangy kick that perfectly offsets the sweetness of the corn, enhancing every bite.
-
Korean BBQ Ribs: Tender, flavorful ribs are the ideal match, bringing bold savory notes that harmonize beautifully with the mild corn cheese.
-
Sweet Potato Fries: Crispy sweet potato fries drizzled with a touch of honey offer a crunchy sweet contrast, adding delightful flavor nuances.
-
Sparking Water or Soju: The effervescence of sparkling water or a shot of this traditional Korean spirit brings a refreshing palate cleanse between bites.
-
Chocolate Mousse: For dessert, a rich, velvety chocolate mousse provides a luxurious finish, sweetening up your meal's ending in a delightful way.
Make Ahead Options
Korean Corn Cheese is a fantastic dish for meal prep, allowing you to save time on busy weeknights! You can prepare the creamy corn mixture up to 24 hours in advance. Simply combine the sweet corn, cheeses, mayonnaise, garlic, green onions, and seasonings in a bowl, cover it tightly, and refrigerate. This ensures the flavors meld beautifully while preserving the dish’s quality. When you're ready to enjoy, simply spread the mixture in a baking dish, top with cheese, and bake for 15-20 minutes until bubbly and golden. This way, you can have hearty, homemade comfort food with minimal effort!
Korean Corn Cheese Recipe FAQs
What type of corn should I use?
Absolutely! You can use either canned sweet corn or frozen corn for this recipe. If using canned corn, make sure to drain and rinse it well to reduce excess sodium. For frozen corn, just let it thaw beforehand, ensuring a uniform texture and sweetness throughout the dish.
How should I store leftovers?
Very simple! Store any leftover Korean Corn Cheese in an airtight container in the fridge for up to 3 days. Make sure to let it cool to room temperature before sealing it. If you wish to keep it longer, it can be frozen in a well-sealed container or heavy-duty freezer bag for up to 2 months.
Can I freeze Korean Corn Cheese?
Absolutely! To freeze, first let the Korean Corn Cheese cool completely. Then, place it in a freezer-safe container or zip-lock bag, making sure to remove as much air as possible. When ready to use, simply thaw it overnight in the fridge, and then reheat in the oven at 350°F (175°C) for about 15-20 minutes until warmed through.
What’s the best way to reheat Korean Corn Cheese?
Reheating is so easy! You can microwave individual portions for a quick snack, or place the entire dish back in the oven at 350°F (175°C) for about 15-20 minutes. For an extra cheesy delight, sprinkle a bit more cheese on top before reheating, letting it melt into a gooey, savory layer.
Is this Korean Corn Cheese suitable for kids?
Absolutely! This dish is not only gluten-free but also very kid-friendly due to its creamy texture and delightful flavors. You can adjust the amount of garlic or skip the jalapeños for younger palates. Overall, it’s a great way to sneak in some veggies while still delighting their taste buds!
Can I add other ingredients or variations?
Very much! Feel free to customize your Korean Corn Cheese. You can add cooked bacon bits for a savory twist, or mix in sautéed bell peppers for added color and crunch. The more the merrier, so let your creativity shine with this comforting dish!

Cheesy Korean Corn Cheese That Everyone Will Love
Equipment
- baking dish
- mixing bowl
- spatula
Ingredients
For the Mixture
- 2 cups sweet corn canned or frozen
- 1 cup shredded mozzarella cheese
- ½ cup mayonnaise
- ¼ cup cream cheese softened
- 1 tablespoon sugar
- 1 tablespoon minced garlic
- 2 green onions chopped
- ¼ teaspoon salt
- ¼ teaspoon black pepper
For Optional Toppings
- sliced jalapeños for heat
- additional cheese shredded mozzarella or parmesan
Instructions
Step-by-Step Instructions
- Preheat your oven to 375°F (190°C).
- If using canned corn, drain and rinse it. If using frozen corn, thaw it in a bowl for a few minutes.
- In a large mixing bowl, combine sweet corn, shredded mozzarella cheese, mayonnaise, softened cream cheese, sugar, minced garlic, chopped green onions, salt, and black pepper. Mix thoroughly.
- Pour the mixture into a baking dish, spreading it evenly.
- Optionally sprinkle more shredded mozzarella or parmesan cheese over the top.
- Bake in the oven for 15-20 minutes until bubbling and golden brown.
- Remove from the oven and let cool for a few minutes before serving.
- Garnish with chopped green onions or sliced jalapeños before serving.


Leave a Reply