
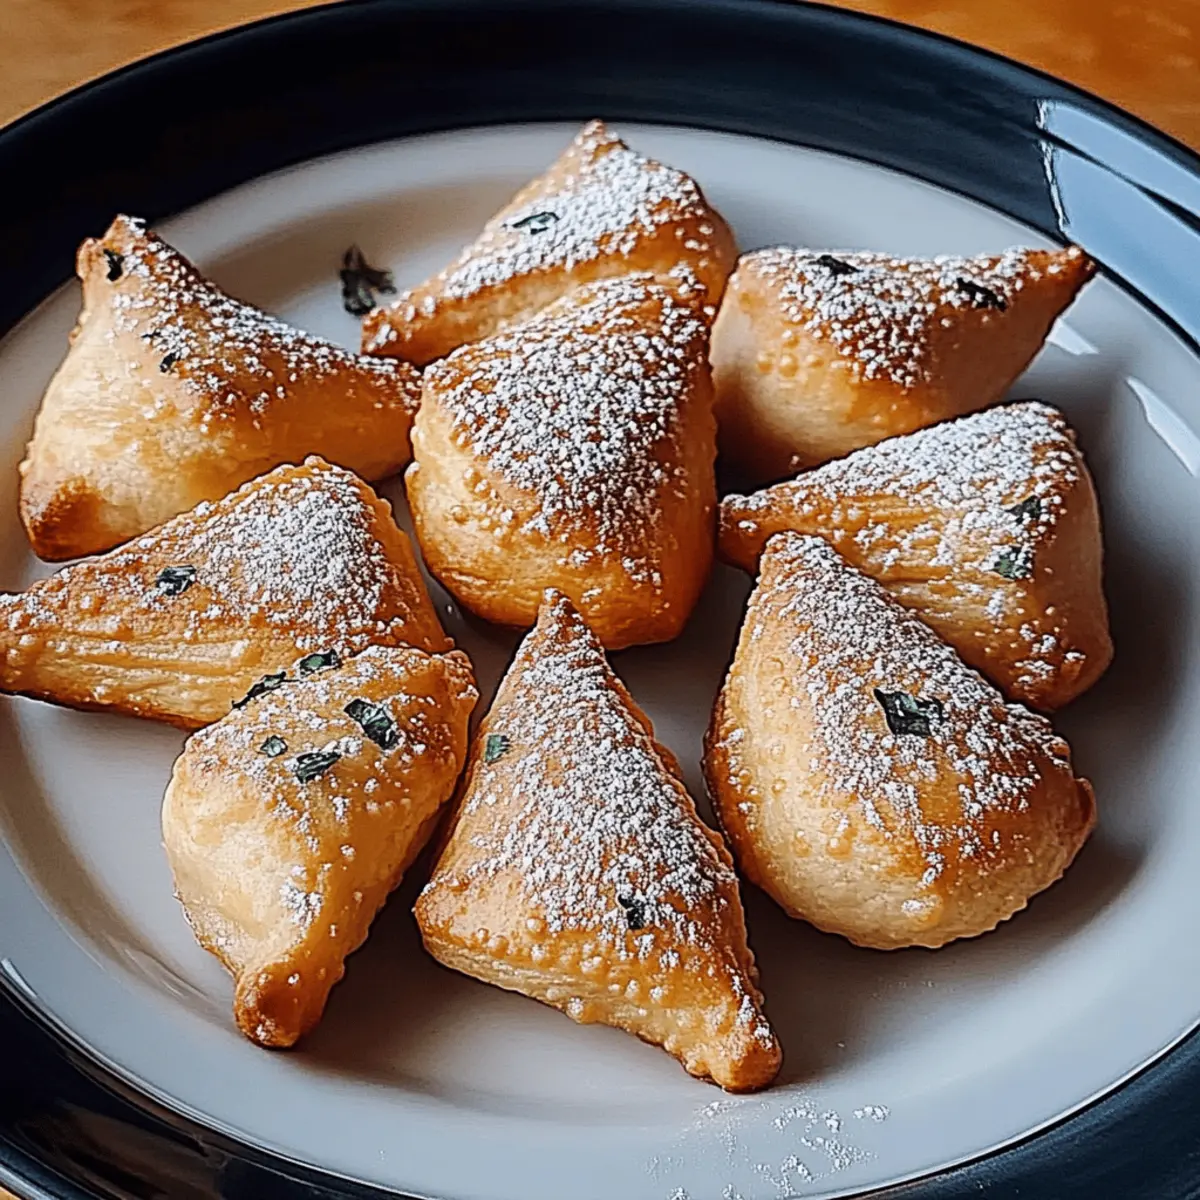
As I rummaged through my pantry, the remnants of a long week caught my eye: a tube of crescent roll dough sitting uneasily beside a half-empty bag of chocolate chips. Suddenly, inspiration struck! With Halloween around the corner, I decided to whip up some enchanting Crescent Roll Witch Hats. Not only are these adorable treats a crowd-pleaser at any gathering, but they also come together in a snap—ready in just 25 minutes! The delightful combination of gooey chocolate and a playful twist of candy corn on top makes every bite a fun experience for both kids and adults alike. Want to learn how to bake up these delightful little delights? Let’s dive into this bewitching recipe!

Why Are Crescent Roll Witch Hats Perfect?
Quick to Make: In just 25 minutes, you can serve up these delightful treats, making them perfect for last-minute gatherings or Halloween parties. Easily Adaptable: Swap ingredients like using peanut butter chips or seasonal sprinkles for a fun twist. Charming Presentation: Their whimsical hat shape, topped with candy corn, adds an appealing visual treat that children will love. Great for Sharing: This recipe yields 8 servings, perfect for sharing with friends or family. Not Just Halloween: These Crescent Roll Witch Hats can be enjoyed anytime, bringing a festive spirit to any occasion! For more fun and spooky dessert ideas, check out our collection of Halloween-themed recipes.
Crescent Roll Witch Hats Ingredients
For the Dough
• Refrigerated crescent roll dough – Grab a can of this for that perfect flaky texture when baked.
For the Filling
• Semi-sweet chocolate chips – These add a delightful gooeyness that pairs perfectly with the crunchy exterior.
For the Topping
• Candy corn – These whimsical candies not only add a pop of color but also a sweet crunch to your Crescent Roll Witch Hats.
For Baking
• Cooking spray – Gives the baking sheet a non-stick surface, ensuring easy removal after baking.
Embrace the spirit of the season with these quick and easy Crescent Roll Witch Hats that are sure to delight!
Step‑by‑Step Instructions for Crescent Roll Witch Hats
Step 1: Preheat the Oven
Start by preheating your oven to 375°F (190°C). While the oven heats up, line a baking sheet with parchment paper or spray it lightly with cooking spray to ensure your Crescent Roll Witch Hats come off easily after baking. This step is crucial for achieving that delightful golden-brown finish!
Step 2: Prepare the Dough
Unroll your refrigerated crescent roll dough on a clean surface and carefully separate it into individual triangles. Lay each triangle flat, ensuring the points are facing away from you, creating the perfect canvas for your witch hats.
Step 3: Add Chocolate Chips
At the wide end of each triangle, place a generous mound of semi-sweet chocolate chips. Aim for a good handful—it'll create a scrumptious center for your Crescent Roll Witch Hats.
Step 4: Shape the Hats
Begin rolling each triangle from the wide end towards the pointy tip, gently shaping them into hats. Be sure to pinch the seams tightly to prevent any chocolate from oozing out during baking. This step will help maintain the whimsical shape!
Step 5: Bake the Hats
Arrange your filled and shaped Crescent Roll Witch Hats on the prepared baking sheet, leaving some space between each. Slide the baking sheet into the oven and bake for 12-15 minutes, or until the hats turn beautifully golden brown and have that enticing bakery aroma wafting through your kitchen.
Step 6: Add Candy Corn Topping
Once baked, remove the Crescent Roll Witch Hats from the oven and let them cool slightly. While they are still warm, place a piece of candy corn on top of each witch hat for a fun and festive touch. This will not only add a pop of color but also a delightful crunch!

How to Store and Freeze Crescent Roll Witch Hats
Room Temperature: Store leftover Crescent Roll Witch Hats in an airtight container at room temperature for up to 2 days to maintain freshness and crunch.
Fridge: If you prefer to extend their shelf life, keep the hats in the fridge for up to a week, but be aware that they may lose some crunchiness.
Freezer: For longer storage, you can freeze the baked hats for up to 2 months. Wrap them tightly in plastic wrap, then place in a freezer bag for best results.
Reheating: To restore their delightful crunch, reheat the Crescent Roll Witch Hats in the oven at 350°F (175°C) for a few minutes before serving.
What to Serve with Crescent Roll Witch Hats
Imagine gathering friends and family around a table, the aroma of warm chocolate mingling with the laughter of joyous conversation—it’s the perfect way to create lasting memories.
-
Creamy Pumpkin Soup: This silky, rich soup adds warmth and seasonal flavor, making it a delightful contrast to the sweet hats.
-
Fruit Salad: A fresh and colorful fruit salad balances the indulgence of the Crescent Roll Witch Hats with a burst of natural sweetness.
-
Caramel Apple Dip: Add a fun twist by pairing your treats with a creamy caramel dip, perfect for dipping apple slices and enlivening the dessert table.
-
Hot Chocolate Bar: Set up a cozy hot chocolate station with marshmallows and whipped cream to enhance the playful nature of your treats.
-
Spiced Nuts: A bowl of spiced nuts provides a crunchy, savory contrast to the sweetness, offering a delightful balance of flavors.
-
Vibrant Green Salad: A light, crisp salad with a tangy vinaigrette can cleanse the palate between bites of the rich, chocolate-filled witch hats.
-
Sweet Wine: Pair with a glass of sweet dessert wine; its fruity notes complement the chocolate and candy corn beautifully.
-
Gingerbread Cookies: Toss in some festive gingerbread cookies for a delightful mix of textures and flavors that echoes the holiday spirit.
-
Ice Cream Sundaes: Offer a build-your-own sundae station complete with toppings, allowing guests to add a scoop alongside their witch hats for a whimsical dessert combo.
-
Cinnamon Apple Cider: Warm spiced apple cider is a cozy drink that rounds out this charming spread, evoking the essence of fall with every sip.
Crescent Roll Witch Hats Variations
Feel free to sprinkle your magical touch on these delightful treats by customizing them with your favorite ingredients!
-
Peanut Butter Bliss: Replace chocolate chips with peanut butter chips for a nutty flavor that adds richness to the whimsical hats.
-
Festive Sprinkles: Toss in seasonal sprinkles before rolling to give your hats a little extra color and fun. A vibrant touch makes them even more inviting during celebrations!
-
Pumpkin Spice: Mix in a dash of pumpkin spice with your chocolate chips for a seasonal twist that’s perfect for autumn gatherings. The warmth of the spice will make these treats a fall favorite.
-
Mini Marshmallows: Add a few mini marshmallows inside each hat for a delightful gooey surprise when you bite into them. They can make the inside extra soft and festive!
-
Nutty Crunch: Fold in crushed nuts, like pecans or walnuts, with the chocolate chips for a pleasing crunch. This will create a delightful contrast in texture that adds a new dimension to your treats.
-
Spicy Kick: Incorporate a sprinkle of cayenne pepper into the chocolate chips for a fun, unexpected heat. The spiciness will surprise your taste buds!
-
Fruit Filler: Swap out some of the chocolate chips for dried fruits, like cranberries or raisins, for a chewy and tangy addition. This sweet and tart combo can really enhance the overall flavor experience.
-
Cat Hats: For a fun twist, shape the crescents into little cat ears instead of witch hats and use different toppings like chocolate glaze for eyes. It’s a cute variation that’s sure to delight kids!
Explore these variations to create your own charming versions of Crescent Roll Witch Hats! And if you’re looking for other spooky inspirations, check out our Halloween-themed recipes for more delicious fun.
Make Ahead Options
These Crescent Roll Witch Hats are a fantastic option for meal prep, allowing you to enjoy more time during your festivities! You can prepare the dough and shape the hats up to 24 hours in advance; simply store them covered in the refrigerator to maintain freshness. Additionally, you can also pre-fill the chocolate chips but avoid adding the candy corn until you’re ready to bake, as it can become too soft overnight. When ready to bake, just pop them in the oven for those 12-15 minutes until golden brown and finish by placing the candy corn on top while warm for a delightful touch. This way, you’ll have these enchanting treats ready for your guests with minimal last-minute effort!
Expert Tips for Crescent Roll Witch Hats
-
Choose Quality Dough: Use a fresh can of refrigerated crescent roll dough for the best texture and rise. Expired dough can lead to an uneven bake.
-
Don’t Overfill: Avoid putting too many chocolate chips at the wide end. Overfilling can cause the hats to burst open and lose their shape when baked.
-
Pinch Seams Tightly: Make sure to pinch the seams firmly after rolling each triangle. This ensures your Crescent Roll Witch Hats hold their whimsical shape throughout the baking process.
-
Watch Baking Time: Keep an eye on the oven! Bake the hats until they are golden brown—undercooking can result in a doughy center.
-
Add Candy Corn While Warm: Place candy corn on top of each hat while they are still warm for better adhesion. This helps the candy stick and prevents it from sliding off.
-
Experiment with Fillings: Get creative! Try different fillings like butterscotch chips or Nutella to create your own twist on these Crescent Roll Witch Hats.
Crescent Roll Witch Hats Recipe FAQs
What is the best way to select crescent roll dough?
Absolutely! Look for crescent roll dough that is within the expiration date for the best results. Ensure the can is intact, without dents or leaks. Fresh dough will have a flaky texture after baking, whereas older dough may not rise properly.
How should I store leftover Crescent Roll Witch Hats?
Certainly! Leftover Crescent Roll Witch Hats can be stored in an airtight container at room temperature for up to 2 days. If you want to extend their freshness, refrigerate them for up to a week, but note that refrigeration may soften their delightful crunch.
Can I freeze Crescent Roll Witch Hats, and if so, how?
Very! To freeze, allow the baked hats to cool completely. Next, wrap each hat tightly in plastic wrap to prevent freezer burn, then place them in a labeled freezer bag. This way, they can be stored for up to 2 months. When ready to enjoy, thaw them in the fridge overnight, then reheat in the oven at 350°F (175°C) for a few minutes to restore crispness.
What should I do if my Crescent Roll Witch Hats don’t hold their shape?
The more the merrier! If your hats are falling apart, it may be due to overfilling them with chocolate chips. Be sure to only add a small mound at the wide end and pinch the seams tightly. Also, consider ensuring they are baked until golden brown as underbaking can lead to a doughy center.
Are there any dietary considerations for making these treats?
Absolutely! If you’re catering to allergies, make sure to check the labels on your crescent roll dough and chocolate chips, as they may contain allergens like gluten or dairy. For a nut-free or dairy-free option, use suitable alternatives to chocolate chips, such as dairy-free chocolate or nut butter.
Can I change the topping on my Crescent Roll Witch Hats?
Absolutely! Feel free to get creative with toppings! Instead of candy corn, you can sprinkle mini marshmallows or use seasonal sprinkles for a festive flair. Just remember to place your toppings on while the hats are still warm to help them stick better.

Crescent Roll Witch Hats: Spooktacular Treats in 25 Minutes
Equipment
- Oven
- baking sheet
- parchment paper
Ingredients
For the Dough
- 1 can Refrigerated crescent roll dough For a flaky texture
For the Filling
- 1 cup Semi-sweet chocolate chips Adds gooeyness
For the Topping
- 1 cup Candy corn For color and crunch
For Baking
- 1 spray Cooking spray To prevent sticking
Instructions
Step-by-Step Instructions
- Preheat your oven to 375°F (190°C). Line a baking sheet with parchment paper or spray it with cooking spray.
- Unroll the crescent roll dough and separate it into triangles with points facing away from you.
- Place a mound of chocolate chips at the wide end of each triangle.
- Roll each triangle from the wide end towards the tip, pinching seams tightly.
- Arrange on a baking sheet and bake for 12-15 minutes until golden brown.
- Remove from oven and place candy corn on top while still warm.


Leave a Reply