
As I stood in my kitchen, the delightful aroma of melted Biscoff cookie butter filled the air, instantly transporting me to a cozy café with the perfect little bites of sweetness. That’s when I decided to whip up these No Bake Mini Biscoff Cheesecakes—an irresistible treat that requires no oven and minimal effort! Not only are they a show-stopping dessert perfect for gatherings, but they're also delightfully creamy and satisfyingly crunchy, giving you the best of both worlds. Plus, with just 20 minutes of hands-on prep time, you can dive right into that luscious cheesecake goodness without the wait. Got a sweet tooth? Let’s explore how to make these mini wonders that are sure to impress your friends and family. Ready to get started?
Why are these cheesecakes so special?
No Bake Convenience: These No Bake Mini Biscoff Cheesecakes come together in just 20 minutes, allowing you to enjoy a rich dessert without the hassle of baking.
Decadent Flavor: The delightful blend of cream cheese and Biscoff cookie butter offers a sweet, creamy experience that will leave your taste buds dancing.
Textural Bliss: With a crunchy cookie crust and a velvety filling, each bite delivers a wonderful contrast that keeps dessert exciting.
Perfect for Gatherings: Impress guests at your next get-together with these stunning mini cheesecakes; they’re a guaranteed conversation starter!
Easily Adaptable: Feel free to personalize these treats with toppings like fresh fruit or chocolate drizzles! If you’re looking for more delectable ideas, check out our favorite dessert recipes for inspiration.
Storage Made Easy: Prep ahead of time—these cheesecakes can be made a couple of days in advance, making them a stress-free option for parties.
No Bake Mini Biscoff Cheesecakes Ingredients
• Everything you need is right here!
For the Crust
- Biscoff cookie crumbs – about 1 ½ cups, these provide a wonderfully crunchy base.
- Unsalted butter – 5 tbsp, melted to bind the crumbs and enhance flavor.
- Brown sugar – 1 tablespoon (optional), for a touch of richness in the crust.
For the Filling
- Cream cheese – 8 oz, softened for a smooth, creamy texture.
- Biscoff cookie butter – ½ cup (smooth variety), adding that signature Biscoff flavor.
- Powdered sugar – ½ cup, for sweetness and a velvety consistency.
- Vanilla extract – 1 tsp, to elevate the flavor profile.
For the Whipped Topping
- Heavy whipping cream – 1 cup (cold), whipped to fluffy perfection for lightness.
- Biscoff cookie butter – ½ cup (melted slightly), for drizzling over the cheesecakes.
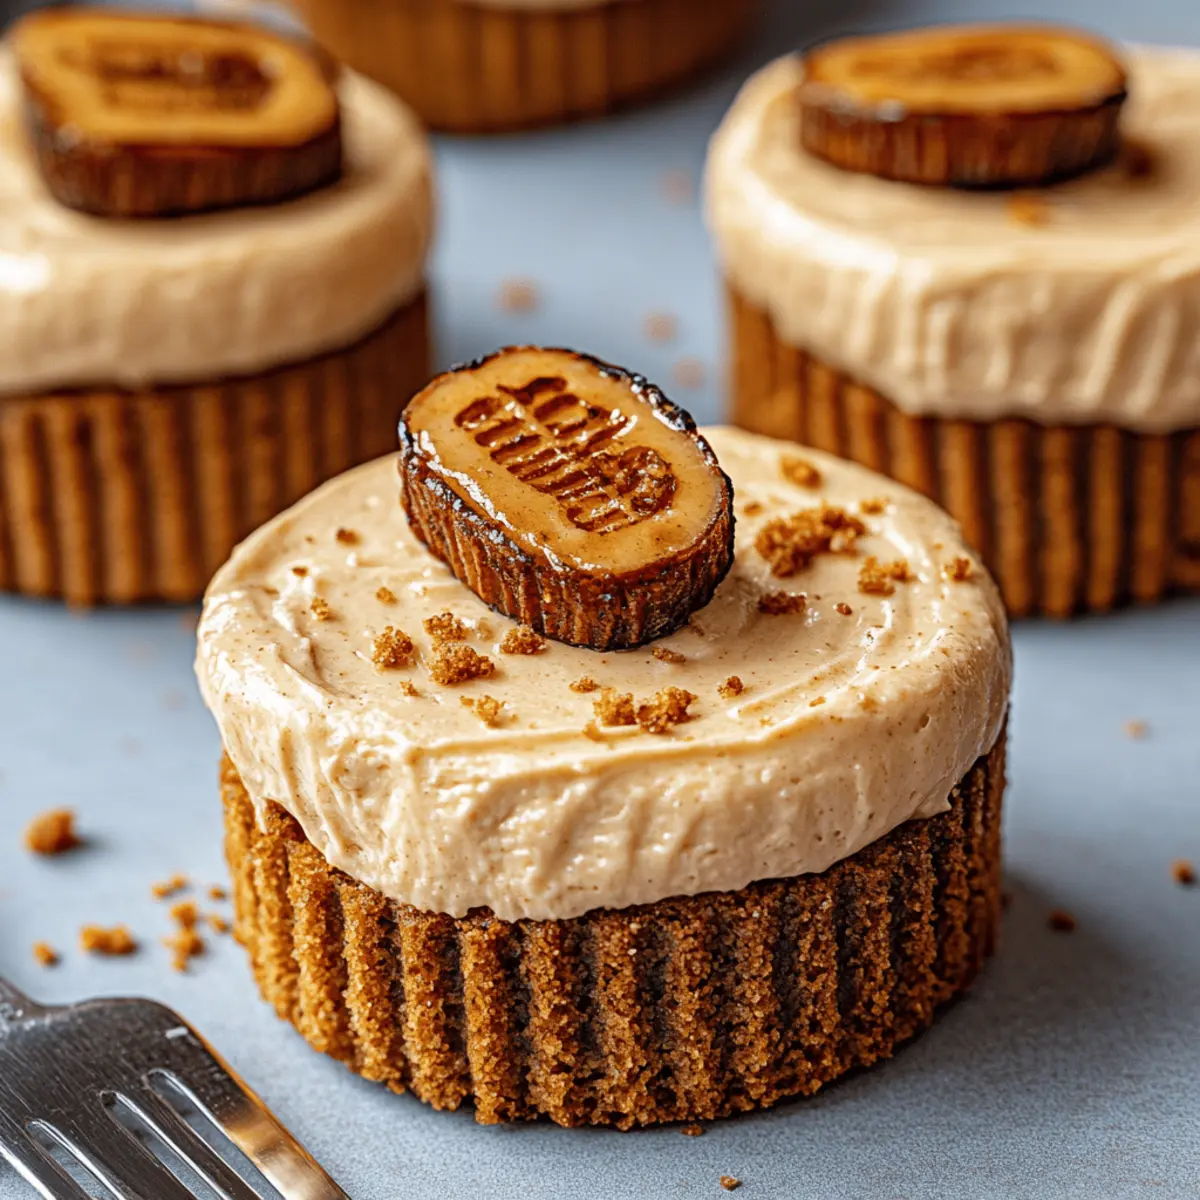
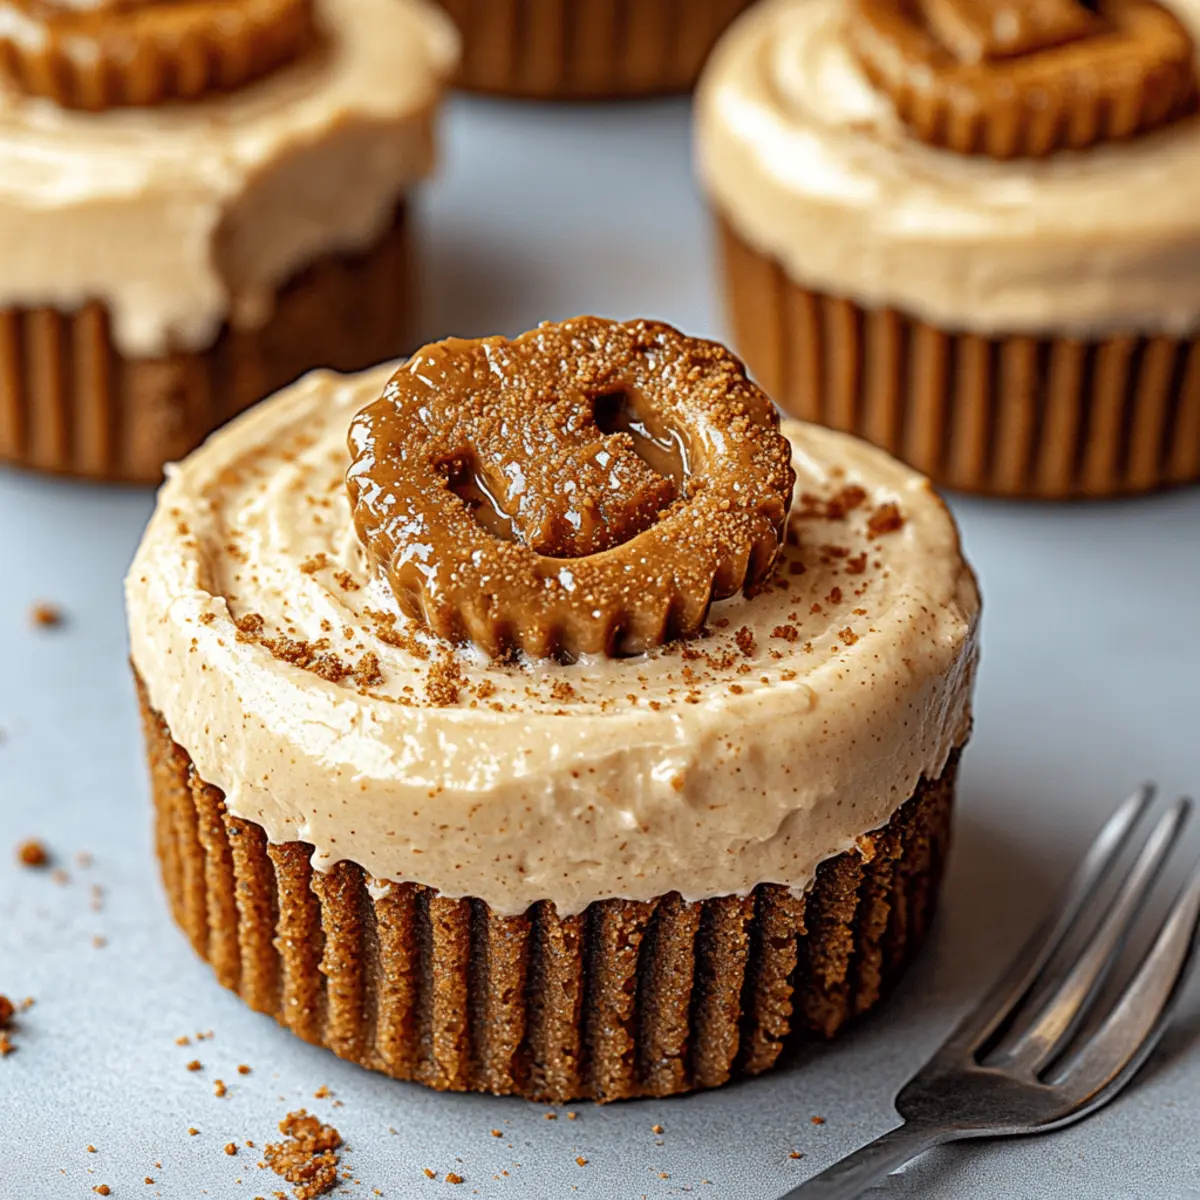
- Extra Biscoff cookie crumbs – as needed for garnish, adding an extra crunch.
- Whipped cream – optional, for serving if you want to add some extra indulgence.
Get ready to indulge in these No Bake Mini Biscoff Cheesecakes that will make your dessert dreams come true!
Step‑by‑Step Instructions for No Bake Mini Biscoff Cheesecakes
Step 1: Prepare the Muffin Pan
Start by lining a muffin pan with cupcake liners or using silicone molds for easy pops of the cheesecakes. This small but crucial step ensures each mini cheesecake can be removed effortlessly after chilling. Prepping the pan ahead of time will save you hassle later when it’s time to enjoy your delightful No Bake Mini Biscoff Cheesecakes.
Step 2: Make the Crust
In a mixing bowl, combine 1 ½ cups of Biscoff cookie crumbs, 5 tablespoons of melted unsalted butter, and an optional tablespoon of brown sugar. Stir the mixture thoroughly until it resembles wet sand. This tasty blend creates a solid, crumbly crust. Once combined, scoop about 1 ½ tablespoons into each muffin liner, pressing down firmly to form a compact base. Let the tray chill in the fridge while you prepare the filling.
Step 3: Beat the Cream Cheese
In a large mixing bowl, beat 8 ounces of softened cream cheese with an electric mixer until it’s smooth and creamy, about 2-3 minutes. This step ensures your No Bake Mini Biscoff Cheesecakes have a wonderfully velvety texture. Make sure to scrape down the sides of the bowl to get everything incorporated, creating a luxurious cheesecake filling that everyone will love.
Step 4: Mix in the Flavor
Add ½ cup of Biscoff cookie butter, ½ cup of powdered sugar, and 1 teaspoon of vanilla extract into the cream cheese mixture. Beat everything together on medium speed until fully combined and fluffy, which should take around 1-2 minutes. This step is where the delightful flavor of the Biscoff shines, making your filling sweet and rich.
Step 5: Whip the Cream
In a separate bowl, whip 1 cup of cold heavy whipping cream using an electric mixer until stiff peaks form, which should take about 3-5 minutes. The whipped cream adds lightness and airy texture to your cheesecake mix. Make sure not to overwhip, as you want it fluffy, not grainy. This creamy goodness is what makes your No Bake Mini Biscoff Cheesecakes extra special.
Step 6: Fold the Cream
Gently fold the whipped cream into the Biscoff cheesecake mixture with a spatula, taking care to preserve the airy texture. Continue folding until the mixture is smooth and well blended, ensuring there are no visible lumps of cream. This step is crucial for creating a luscious filling that’s both rich and light, perfectly embodying the spirit of No Bake Mini Biscoff Cheesecakes.
Step 7: Fill the Crusts
Spoon or pipe the cheesecake filling generously on top of your chilled crusts in the muffin pan. Use a spatula or the back of a spoon to smooth the tops for a clean finish. Ensuring even filling will make your cheesecakes beautiful and allow for uniform chilling. Once filled, return the tray to the fridge for an additional set time.
Step 8: Chill to Perfection
Allow the filled mini cheesecakes to chill in the refrigerator for at least 4 hours, or overnight for the best results. This chilling time is essential for setting the filling, making it firm yet creamy. Your patience will be rewarded as these No Bake Mini Biscoff Cheesecakes firm up and develop delicious flavors during the chilling process.
Step 9: Warm the Biscoff Topping
Shortly before serving, take ½ cup of Biscoff cookie butter and gently warm it in the microwave for about 10-15 seconds until it’s pourable. This subtle warming enhances the flavor and makes it easy to drizzle over your chilled cheesecakes. Take care not to overheat, as you want it to remain thick yet fluid for perfect drizzle.
Step 10: Garnish and Serve
Drizzle or spread the warmed Biscoff cookie butter over each mini cheesecake to create a beautiful topping. For an added crunch, sprinkle extra Biscoff cookie crumbs on top. If desired, top with a dollop of whipped cream. Serve these No Bake Mini Biscoff Cheesecakes chilled, allowing everyone to savor the incredible flavors and texture you’ve created.
Make Ahead Options
These No Bake Mini Biscoff Cheesecakes are perfect for meal prep enthusiasts looking to save time during busy weeks! You can prepare the crust and cheesecake filling up to 24 hours in advance. Simply follow the crust and filling instructions, then store them separately in airtight containers in the refrigerator to maintain their freshness. When you're ready to serve, just fill the pre-made crusts with your chilled cheesecake mixture, drizzle with warmed Biscoff cookie butter, and garnish. This way, you’ll have a delightful dessert ready to impress your guests or family with minimal effort on the day of serving!
No Bake Mini Biscoff Cheesecakes Variations
Feel free to let your creativity shine with these delightful variations that will elevate your cheesecakes to new heights!
-
Gluten-Free: Swap Biscoff cookie crumbs with gluten-free cookies for a delicious treat suitable for gluten-sensitive guests. They’ll still pack a punch of flavor!
-
Vegan: Use vegan cream cheese and coconut whipped cream to keep it dairy-free. Combine with a vegan cookie crust for an indulgent, plant-based version everyone will adore.
-
Chocolate Lovers: Fold in mini chocolate chips to the filling for a rich, decadent every bite. You can even drizzle with chocolate syrup instead of Biscoff for a sweet twist.
-
Spice It Up: Add a pinch of cinnamon or nutmeg to the cheesecake mixture for a warm, spiced flavor. Pair it with a hint of ginger in the crust for an exciting flavor boost.
-
Fruit-Infused: Top with fresh fruit like raspberries or strawberries for a juicy contrast to the creamy filling. It adds a refreshing zing that complements the richness wonderfully.
-
Dairy-Free: Substitute heavy cream with coconut cream for a lighter, dairy-free treat. This twist not only gives a luscious texture but also infuses a hint of tropical flair.
-
Nutty Crunch: Incorporate chopped nuts like almonds or pecans into the crust for added texture and flavor. The delightful crunch will create a pleasing contrast to the creamy filling!
-
Layered Delight: Create a parfait-style dessert by layering the cheesecake filling and crust with alternate layers of fresh fruit or a berry compote for a stunning, colorful presentation!
Excited to dive into these variations? Explore other creative options like our favorite dessert recipes that will spark your culinary imagination and inspire you with more delicious ideas!
What to Serve with No Bake Mini Biscoff Cheesecakes?
Indulging in these delightful mini cheesecakes heralds a sweet experience, and pairing them can turn a simple dessert into a spectacular occasion.
-
Rich Espresso: A warm cup of espresso complements the sweetness of the cheesecakes, balancing flavors with its deep, bold notes.
-
Fresh Berries: Ripe raspberries or strawberries add a refreshing contrast, their tartness brightening the creamy richness of the cheesecakes.
-
Creamy Vanilla Ice Cream: The smoothness of vanilla ice cream enhances the dessert's texture, providing a delightful coolness that’s irresistible.
-
Whipped Cream: A fluffy dollop on top is a classic addition, enhancing the dessert’s charm and inviting creaminess.
-
Chocolate Drizzle: A gently drizzled chocolate warm sauce creates a decadent pairing, adding a touch of sophistication and indulgence.
-
Decadent Hot Chocolate: For a cozy treat, rich hot chocolate ties perfectly with the gooey Biscoff flavors, celebrating the warmth of sweet moments.
-
Nutty Biscotti: These crunchy treats add a delightful crisp to each bite, making it a must-have pairing with a cup of coffee or tea for dipping.
Creating the perfect pairing elevates your No Bake Mini Biscoff Cheesecakes, ensuring a memorable experience for every sweet tooth!
How to Store and Freeze No Bake Mini Biscoff Cheesecakes
Fridge: These mini cheesecakes can be stored in the fridge for up to 2 days in an airtight container. This keeps them fresh and creamy until you're ready to serve.
Freezer: For longer storage, freeze the cheesecakes for up to 1 month. Wrap each mini cheesecake in plastic wrap and then place them in a freezer-safe container to prevent freezer burn.
Thawing: To enjoy a frozen cheesecake, simply transfer it to the fridge and allow it to thaw overnight. This ensures the texture remains intact for a delightful treat.
Reheating: These cheesecakes are best served chilled. If you've frozen them, avoid reheating in the microwave; instead, enjoy them cold or at room temperature for the perfect taste experience.
Expert Tips for No Bake Mini Biscoff Cheesecakes
-
Optimal Chilling Time: Always chill the cheesecakes for at least 4 hours, but overnight is ideal. This allows the flavors to meld beautifully and the filling to set perfectly.
-
Cream Cheese Quality: Use high-quality cream cheese for the best flavor and texture. Make sure it's softened to room temperature to blend smoothly into the filling.
-
Whipping Cream Technique: Whip the heavy cream until stiff peaks form, but be careful not to overwhip; it should remain creamy, not grainy. This will ensure your No Bake Mini Biscoff Cheesecakes are light and fluffy.
-
Crust Pressure: When pressing the crust mixture into the muffin liners, apply firm pressure. A well-compressed crust prevents crumbling and provides a solid base for the filling.
-
Decorative Touches: Get creative with garnishes! Add fresh berries or a sprinkle of sea salt over the Biscoff drizzle for a beautiful and balanced presentation.
-
Avoiding Overheating: When warming the Biscoff cookie butter, do so in short intervals to avoid overheating. A slightly warmed butter creates the perfect drizzle without losing its creamy texture.

No Bake Mini Biscoff Cheesecakes Recipe FAQs
How do I select ripe ingredients for the cheesecake?
Absolutely! When choosing cream cheese, aim for a fresh package that feels soft and creamy to the touch. For the Biscoff cookie butter, go with a jar that's smooth and free of separation. The fresher the ingredients, the tastier your No Bake Mini Biscoff Cheesecakes will be!
What’s the best way to store the mini cheesecakes?
You can store these beauties in the refrigerator for up to 2 days. Just place them in an airtight container to maintain their freshness and creamy texture. If you want to make them in advance for a gathering, this storage method is perfect!
Can I freeze No Bake Mini Biscoff Cheesecakes?
Absolutely! If you'd like to keep them longer, simply wrap each cheesecake tightly in plastic wrap and place them in a freezer-safe container. They’ll stay delicious for up to 1 month. When you’re ready to enjoy one, just thaw it in the fridge overnight – it’ll taste just as fresh!
What should I do if the whipped cream doesn't thicken properly?
If your whipped cream isn't reaching stiff peaks, ensure your mixing bowl and beaters are completely clean and chilled. It's best if the heavy cream is cold straight from the fridge. If you find it’s still not thickening, try adding a teaspoon of cornstarch before whipping to help stabilize it.
Are there any dietary concerns I should be aware of?
When preparing these cheesecakes, be cautious with cream cheese if you or your guests have a dairy allergy. The recipe does contain a fair amount of sugar, so it’s not suitable for those on a low-sugar diet. However, you can look into dairy-free cream cheeses and even adjust the sweetness to your taste!
How can I make these cheesecakes nut-free?
The main ingredients in this recipe are nut-free; however, make sure that your Biscoff cookie crumbs do not contain any traces of nuts. Additionally, if you're using other ingredients or toppings, always double-check labels for allergen information. Enjoy the experience of creating your No Bake Mini Biscoff Cheesecakes with peace of mind!
Irresistible No Bake Mini Biscoff Cheesecakes to Savor
Equipment
- Muffin pan
- mixing bowls
- Electric Mixer
- spatula
Ingredients
For the Crust
- 1.5 cups Biscoff cookie crumbs for a crunchy base
- 5 tablespoon Unsalted butter melted
- 1 tablespoon Brown sugar optional
For the Filling
- 8 oz Cream cheese softened
- 0.5 cups Biscoff cookie butter smooth variety
- 0.5 cups Powdered sugar
- 1 teaspoon Vanilla extract
For the Whipped Topping
- 1 cup Heavy whipping cream cold
- 0.5 cups Biscoff cookie butter melted slightly for drizzling
- Extra Biscoff cookie crumbs as needed for garnish
- Whipped cream optional, for serving
Instructions
Preparation
- Start by lining a muffin pan with cupcake liners or using silicone molds to ensure easy removal.
- In a mixing bowl, combine 1.5 cups of Biscoff cookie crumbs, 5 tablespoon of melted unsalted butter, and 1 tablespoon of brown sugar. Stir until it resembles wet sand. Press the mixture firmly into the muffin liners.
- Beat 8 ounces of softened cream cheese with an electric mixer until smooth, about 2-3 minutes.
- Add 0.5 cups of Biscoff cookie butter, 0.5 cups of powdered sugar, and 1 teaspoon of vanilla extract. Beat until fluffy, about 1-2 minutes.
- Whip 1 cup of cold heavy whipping cream until stiff peaks form, about 3-5 minutes.
- Gently fold the whipped cream into the cheesecake mixture until smooth.
- Spoon or pipe the cheesecake filling into the prepared crusts. Smooth the tops.
- Chill the filled cheesecakes in the refrigerator for at least 4 hours, or overnight for the best results.
- Warm 0.5 cups of Biscoff cookie butter in the microwave for 10-15 seconds and drizzle over the cheesecakes before serving.
- Garnish with extra cookie crumbs and whipped cream if desired. Serve chilled.


Leave a Reply