
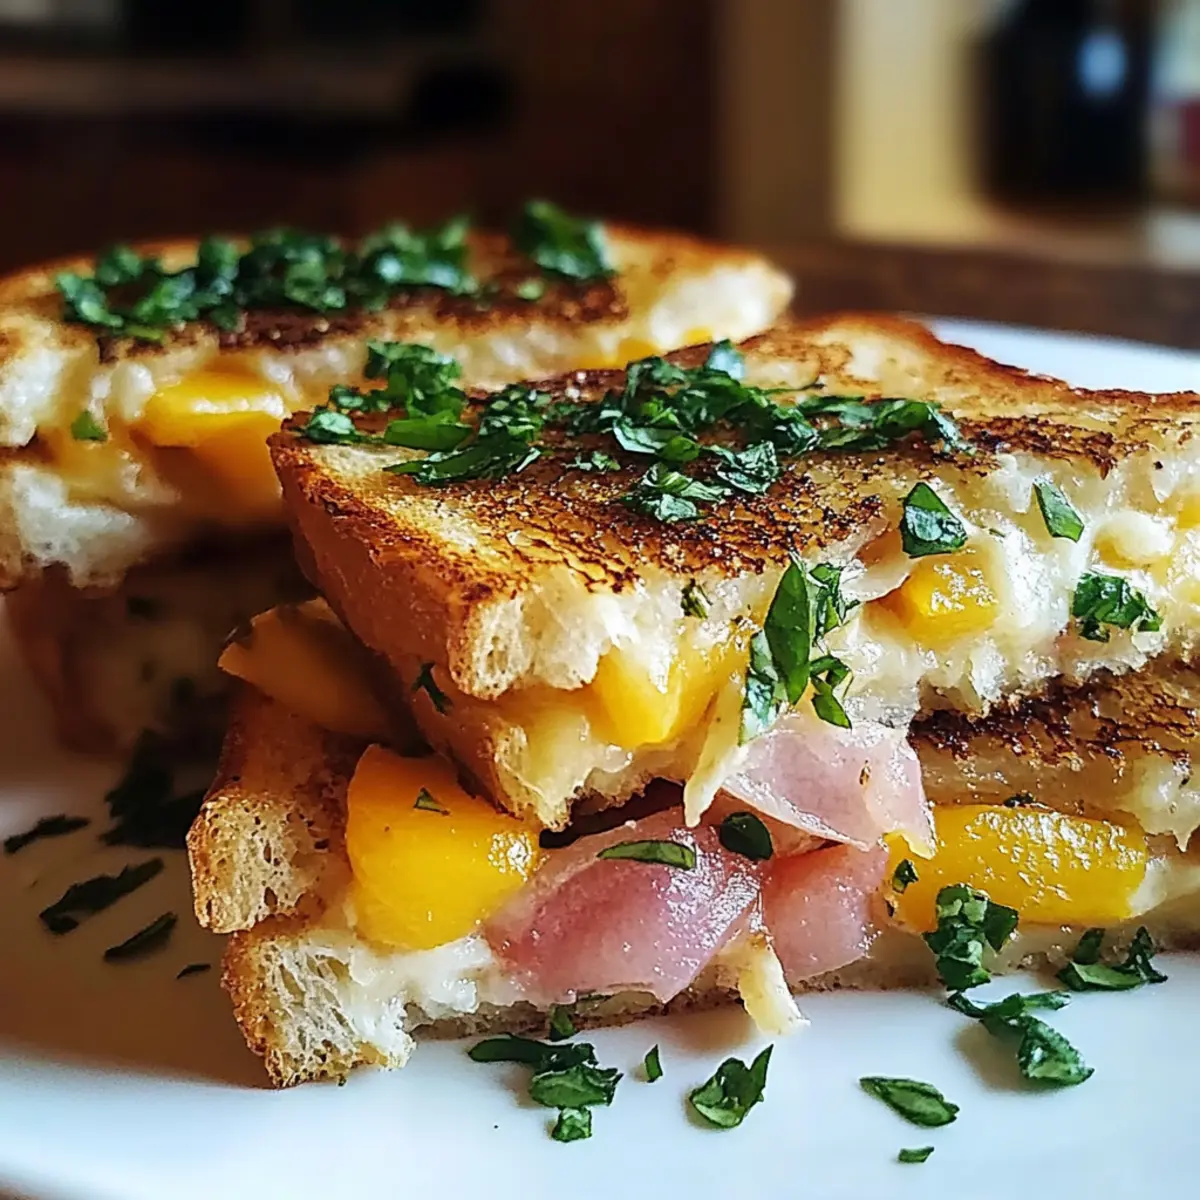
As I stood in my kitchen, the sweet scent of toasted Hawaiian rolls mixed with melting cheddar hung in the air, leading me to indulge in a delightful cooking adventure. This Hawaiian Roll Grilled Cheese is more than just a classic comfort dish; it's a vibrant twist that brings together gooey cheese and the subtle sweetness of the rolls. Perfect for those weekday dinners when time is tight, this recipe comes together in under 30 minutes, making it a lifesaver for busy home chefs. Plus, you can easily customize it with optional ingredients like ham or pineapple to elevate your sandwich game! Are you ready to discover the joy of grilling up this savory sensation? Let’s dive into the details!
Why is Hawaiian Roll Grilled Cheese unforgettable?
Mouthwatering Flavors: The sweetness of Hawaiian rolls perfectly complements the creamy, gooey cheddar cheese, creating a delightful harmony that will keep you coming back for more.
Quick & Easy: With a total cooking time of just 24 minutes, this recipe is ideal for busy evenings when you crave homemade comfort food without the fuss.
Customizable Goodness: Feel free to add cooked ham or crushed pineapple to take this grilled cheese to the next level, making it special for any palate!
Crowd-Pleasing Delight: Whether it’s a family dinner or a weekend get-together, this dish is sure to impress your guests, and it’s an excellent option for game day snacks too.
Fun to Make: Involve the kids in the kitchen! This recipe is simple enough for everyone to join the fun of creating their own grilled cheese masterpiece.
Hawaiian Roll Grilled Cheese Ingredients
For the Sandwich
• 8 Hawaiian rolls – these sweet rolls provide a perfect base for the grilled cheese, enhancing the overall flavor.
• 8 slices of cheddar cheese – choose sharp cheddar for an extra flavor kick that pairs well with the sweetness.
For the Spread
• 4 tablespoons of unsalted butter, softened – this will create a golden, crispy crust on the sandwich.
• 4 tablespoons of mayonnaise – spreading mayonnaise adds a delicious creaminess and helps prevent the bread from becoming soggy.
Optional Additions
• 1 cup of cooked ham, sliced – adds heartiness to your Hawaiian Roll Grilled Cheese for those who love a meatier sandwich.
• 2 tablespoons of fresh pineapple, crushed – this adds a tropical twist and a hint of sweetness that complements the cheese perfectly.
Seasoning & Garnish
• Salt and pepper to taste – a little seasoning balances the flavors in every bite.
• Fresh parsley, chopped – for a pop of color and a fresh touch right before serving; it’s optional but lovely!
Step‑by‑Step Instructions for Hawaiian Roll Grilled Cheese
Step 1: Preheat the Skillet
Begin by preheating a non-stick skillet or griddle over medium heat for about 2 minutes. The skillet should be hot enough to toast the bread but not smoking. Make sure you have all ingredients ready to create your Hawaiian Roll Grilled Cheese, as preparation is key for a smooth cooking process.
Step 2: Prepare the Rolls
Slice each Hawaiian roll in half horizontally to create sandwich-like pieces. You will have 16 halves when finished. Lay them out flat on a clean cutting board, ready to be lathered with delicious spreads that will enhance the flavor of your grilled cheese experience.
Step 3: Butter the Outers
Spread approximately ½ tablespoon of softened butter on the outer side of each Hawaiian roll half. This butter will help achieve a perfect golden-brown crust. Be generous, but ensure it’s evenly applied for an all-over crispy exterior on your Hawaiian Roll Grilled Cheese.
Step 4: Mayo on the Innards
Flip the roll halves over so the inner sides face up, and spread around ½ tablespoon of mayonnaise on each bottom half. This creamy layer adds richness and helps keep your sandwich from becoming soggy while grilling, making each bite delightful and flavorful.
Step 5: Layer the Cheese
Place a slice of cheddar cheese on top of the mayonnaise side of each bottom roll half. If you’re adding optional ingredients, layer a slice of cooked ham followed by some crushed pineapple for a tropical twist. Top with another slice of cheddar cheese to anchor the fillings in place.
Step 6: Assemble the Sandwich
Carefully place the top half of each roll on the cheese layers, making sure the butter side is facing up. Press down gently to help the sandwich hold its shape. This assembly will make grilling easier and ensure every ingredient melds beautifully together in your Hawaiian Roll Grilled Cheese.
Step 7: Grill the Sandwiches
Place the assembled sandwich in the preheated skillet and cook for about 3-4 minutes. Keep an eye on the bottom; it should turn a beautiful golden brown while the cheese begins to melt. This step is crucial for achieving that ideal blend of texture and flavor.
Step 8: Flip and Finish Cooking
Using a spatula, carefully flip the sandwich and cook for an additional 3-4 minutes until the second side is golden brown and the cheese is fully melted. The aroma will be irresistible! If needed, adjust the heat to prevent burning while ensuring the cheese gets perfectly gooey.
Step 9: Cool and Slice
Once cooked, remove the grilled cheese from the skillet and let it cool for about a minute. This cooling time helps the cheese to set slightly, making it easier to slice without everything spilling out.
Step 10: Garnish and Serve
Optionally, sprinkle chopped parsley over the top for a pop of color just before serving. Place your Hawaiian Roll Grilled Cheese on a plate, and prepare to indulge in this comforting treat that is both inviting and utterly delicious.

Tips for the Best Hawaiian Roll Grilled Cheese
Ideal Heat Control: Use medium heat to ensure a perfectly toasted exterior without burning. High heat can lead to a charred outside while the cheese remains unmelted.
Butter vs. Mayo: Don't skip the mayonnaise! It prevents sogginess and adds rich flavor. Some swear by a mayo-only spread for the outside too; give it a try!
Cheese Melting Tip: For the best gooeyness, choose cheese with good melting properties. Sharp cheddar is great, but gouda or mozzarella can also be delightful.
Assembly Matters: Make sure to layer cheese both above and below any optional ingredients like ham or pineapple. This ensures everything stays together when grilling your Hawaiian Roll Grilled Cheese.
Resting Period: Allow your sandwich to rest for a minute before slicing. This helps the melted cheese set slightly and makes for a cleaner cut.
Customize It: Feel free to get creative with your fillings! Try adding sliced jalapeños for a bit of heat or a slice of avocado for creaminess.
Make Ahead Options
These Hawaiian Roll Grilled Cheese sandwiches are perfect for meal prep enthusiasts! You can prepare the rolls by buttering and applying mayonnaise to them up to 24 hours in advance, then refrigerate them in an airtight container to keep them fresh. Additionally, you can pre-slice the cheese and any optional ingredients, like ham or pineapple, and store them in the refrigerator for quick assembly. When ready to serve, simply assemble the sandwiches and grill them as instructed, achieving just as delicious results in no time. This make-ahead strategy ensures that even the busiest evenings can feature a warm, comforting meal with minimal effort!
What to Serve with Hawaiian Roll Grilled Cheese?
Nothing makes a mealtime feel more delightful than pairing the comforting tastes of grilled cheese with complementary sides.
-
Crispy French Fries: Their crunchy exterior and soft interior add a satisfying texture contrast that makes every bite enjoyable.
-
Creamy Tomato Soup: The rich, velvety flavors enhance the cheesy goodness while providing warmth and familiarity, a perfect classic combination.
-
Sweet Potato Wedges: Their natural sweetness balances the savory grilled cheese, creating a playful taste adventure on your plate.
-
Coleslaw: The refreshing crunch and tanginess from the cabbage lighten up the meal while adding a fun mix of flavors.
-
Grilled Pineapple Skewers: Bringing the sunny flavors of the tropics to the table, these sweet bites pair fabulously with the Hawaiian elements of the sandwich.
-
Sparkling Lemonade: This zesty, bubbly drink refreshes your palate, making each bite of the Hawaiian Roll Grilled Cheese feel light and invigorating.
-
Chips and Salsa: A zingy, crunchy option that adds a nice kick and a burst of freshness to your meal, great for those who love a bit of spice.
-
Chocolate Chip Cookies: Tempting dessert to conclude your meal, their gooey sweetness is an irresistible way to finish this comforting experience!
How to Store and Freeze Hawaiian Roll Grilled Cheese
Room Temperature: Enjoy your Hawaiian Roll Grilled Cheese fresh for the best taste and texture. If kept at room temperature, consume within 2 hours to ensure food safety.
Fridge: Place leftovers in an airtight container and refrigerate for up to 3 days. Reheating is best done in a skillet for even warming.
Freezer: For longer storage, wrap individual sandwiches in plastic wrap and foil, then freeze for up to 1 month. Thaw in the fridge overnight before reheating.
Reheating: To revive your grilled cheese, reheat in a skillet over medium heat for 3-4 minutes on each side, ensuring the cheese melts and the bread crisps up beautifully again.
Hawaiian Roll Grilled Cheese Variations
Feel free to get creative and elevate your Hawaiian Roll Grilled Cheese with these delightful twists and substitutions!
- Dairy-Free: Swap cheddar with a plant-based cheese to enjoy a creamy, vegan-friendly version that's just as satisfying.
- Spicy Kick: Add sliced jalapeños or a dash of sriracha for a fun heat level that contrasts beautifully with the sweetness of the rolls.
- Veggie Delight: Layer on fresh spinach or roasted red peppers for added nutrients and a burst of color, making each bite feel fresh and vibrant.
- Herbed Flavor: Mix fresh herbs like basil or oregano into the mayonnaise for a fragrant and delicious twist; this elevates the dish from basic to gourmet.
- Global Fusion: Experiment with a dollop of pesto instead of mayonnaise, bringing an Italian-inspired flair that offers a unique flavor profile.
- Crunchy Layer: Add a sprinkle of crushed potato chips or crispy onions inside for an unexpected textural surprise that complements the meltiness of the cheese.
- Sweet & Savory: Incorporate apple slices or fig jam alongside your cheese for a sweet contrast that'll tantalize your taste buds.
- Tropical Twist: Besides pineapple, try laying down some coconut flakes or mango slices to embrace the paradise vibes in your grilled masterpiece.
These variations can make every grilled cheese experience feel unique and exciting, keeping your family eagerly awaiting what’s next at your dinner table! If you're in the mood for something more classic, perhaps check out our tips on enhancing vegetable grilled cheese or even enjoy with a delightful side of tomato soup for a comforting meal pairing!

Hawaiian Roll Grilled Cheese Recipe FAQs
What should I look for when selecting Hawaiian rolls?
When selecting Hawaiian rolls, look for those that are soft and pillowy with a slightly golden hue. Ensure there are no dark spots or visible mold. The fresher, the better! Try to pick rolls from the bakery section rather than pre-packaged ones, as they often have a richer flavor.
How should I store leftover Hawaiian Roll Grilled Cheese?
To store any leftovers, place your Hawaiian Roll Grilled Cheese in an airtight container and refrigerate for up to 3 days. This keeps the sandwich fresh, though it’s best to consume within the first day or two. When reheating, I recommend using a skillet to regain that lovely crispiness!
Can I freeze Hawaiian Roll Grilled Cheese?
Absolutely! For freezing, wrap each sandwich tightly in plastic wrap and then in foil. This double-layer prevents freezer burn and keeps the flavor intact. You can freeze them for up to 1 month. When you're ready to enjoy, thaw in the fridge overnight, then reheat in a skillet for about 3-4 minutes on each side for the best texture.
What if my grilled cheese isn’t melting properly?
If your cheese isn’t melting, it may be due to the heat being too low. Make sure your skillet is preheated to medium. For optimal melting, cover the skillet with a lid during cooking, creating steam that helps the cheese melt thoroughly while the bread toasts. Adding a splash of water to the pan before covering can also aid in this process.
Is this recipe suitable for children?
Yes! The Hawaiian Roll Grilled Cheese is a kid-friendly option that can be adapted to various tastes. You can omit the ham or pineapple if your kids prefer a more classic cheese sandwich. Just make sure to supervise them during the cooking process and let them assist with spreading the butter and mayo for a fun cooking experience!
Can I use a different type of cheese in this recipe?
Very! You can definitely switch out cheddar for other melty cheeses like gouda or mozzarella based on your preference. Each cheese has its unique flavor and melting quality, so feel free to experiment. Gouda will give a lovely smoky flavor, while mozzarella provides a stringy, gooey texture.

Melt-in-Your-Mouth Hawaiian Roll Grilled Cheese Bliss
Equipment
- Non-stick skillet or griddle
Ingredients
For the Sandwich
- 8 rolls Hawaiian rolls these sweet rolls provide a perfect base for the grilled cheese
- 8 slices cheddar cheese choose sharp cheddar for extra flavor
For the Spread
- 4 tablespoons unsalted butter, softened creates a golden, crispy crust
- 4 tablespoons mayonnaise adds creaminess to prevent sogginess
Optional Additions
- 1 cup cooked ham, sliced adds heartiness for a meatier sandwich
- 2 tablespoons fresh pineapple, crushed adds sweetness that complements the cheese
Seasoning & Garnish
- salt to taste
- pepper to taste
- fresh parsley, chopped optional, for garnish
Instructions
Step-by-Step Instructions
- Preheat a non-stick skillet or griddle over medium heat for about 2 minutes.
- Slice each Hawaiian roll in half horizontally to create 16 halves.
- Spread approximately ½ tablespoon of softened butter on the outer side of each half.
- Flip the roll halves over and spread around ½ tablespoon of mayonnaise on each bottom half.
- Place a slice of cheddar cheese on each bottom half, and optionally add ham and pineapple.
- Place the top half on the cheese layers, ensuring the butter side is up.
- Place the assembled sandwich in the skillet and cook for about 3-4 minutes.
- Carefully flip the sandwich and cook for an additional 3-4 minutes until golden brown.
- Remove the grilled cheese from the skillet and let it cool for about a minute.
- Optionally, sprinkle chopped parsley over the top before serving.


Leave a Reply