
I’ll never forget the first time I tried Red Velvet Cinnamon Rolls—those brilliantly rich swirls of color beckoned as if they were a delicious secret waiting to be uncovered. Reimagining a classic treat from scratch, these rolls blend the comforting flavors of cinnamon and cocoa with a stunning pop of red, perfect for any gathering or a cozy weekend brunch. Not only do they look beautiful on the plate, but they're also surprisingly quick to prepare, bringing a festive flair to your table without the stress. Plus, their warm, frosted goodness is bound to become a beloved favorite among family and friends. Curious to learn how to create your own mouthwatering batch? Let’s dive in!

Why Are Red Velvet Cinnamon Rolls So Special?
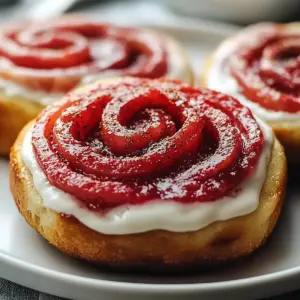
Uniqueness: These rolls are a delightful twist on traditional cinnamon rolls, infusing the classic flavors with the vibrant allure of red velvet.
Easy to Make: With just a few simple ingredients and straightforward steps, even novice bakers can impress their friends and family.
Crowd-Pleaser: Perfect for brunch or holiday gatherings, these rolls are sure to be the star of any table, winning hearts with their stunning visual appeal and irresistible flavor.
Delicious Cream Cheese Frosting: Topping them with a luscious cream cheese frosting adds a creamy tang that beautifully balances the sweetness.
Versatile Base: Feel free to customize these rolls by adding in nuts or experimenting with different toppings. Want more delicious ideas? Check out my guide on baking perfect cinnamon rolls for tips that will elevate your baking game!
Red Velvet Cinnamon Rolls Ingredients
Get ready to create these show-stopping treats!
For the Dough
- 4 cups all-purpose flour – This is the foundation of your rolls, providing that soft, chewy texture.
- 1 cup milk – Warm milk helps activate the yeast for a fluffy rise.
- ½ cup sugar – Sweetens the dough and balances the cocoa's bitterness.
- ¼ cup unsweetened cocoa powder – Adds a rich chocolate flavor to our red velvet cinnamon rolls!
- ½ cup unsalted butter, softened – Infuses richness and moisture into the dough.
- 2 large eggs – Acts as a binding agent, creating that lovely structure.
- 1 teaspoon vanilla extract – Enhances the overall flavor profile beautifully.
- ½ teaspoon salt – Brings out the sweet and rich flavors in the rolls.
- ¼ teaspoon baking soda – Helps with texture and promotes the perfect rise.
- 1 tablespoon active dry yeast – Essential for that delightful fluffiness!
For the Cream Cheese Frosting
- ½ cup cream cheese, softened – Provides a creamy texture and tangy flavor.
- 2 tablespoons butter, softened – Adds richness to the frosting.
- ½ cup powdered sugar – Sweetens the frosting and adds a smooth finish.
- 1 teaspoon milk – Adjusts the consistency for perfect spreading.
For the Red Color
- 2 large tablespoons red food coloring – This key ingredient gives your rolls that signature red velvet appearance!
Step‑by‑Step Instructions for Red Velvet Cinnamon Rolls
Step 1: Activate the Yeast
In a small bowl, dissolve 1 tablespoon of active dry yeast in 1 cup of warm milk (about 110°F). Let it sit for approximately 5 minutes until it becomes foamy, indicating that the yeast is alive and ready to work its magic. This step is crucial for achieving that light, fluffy texture in your red velvet cinnamon rolls.
Step 2: Combine Dry Ingredients
In a large mixing bowl, whisk together 4 cups of all-purpose flour, ½ cup of sugar, ¼ cup of unsweetened cocoa powder, and ½ teaspoon of salt. This dry mixture serves as the base for your rolls, bringing together essential flavors. Make sure to combine these ingredients thoroughly to ensure an even texture in your final dough.
Step 3: Mix Wet Ingredients
Add ½ cup of softened unsalted butter, 2 large eggs, 1 teaspoon of vanilla extract, and 2 large tablespoons of red food coloring into the bowl containing your dry ingredients. Mix everything until it forms a cohesive batter. The vibrant color and rich scent will set the stage for these delightful red velvet cinnamon rolls.
Step 4: Incorporate the Yeast Mixture
Now, pour the activated yeast mixture into your bowl of combined ingredients. Stir everything together until a soft dough forms. If the dough feels too sticky, feel free to add a little more flour to reach the right consistency. This dough is the foundation of your delicious rolls, so ensure it's adequately mixed.
Step 5: Knead the Dough
Transfer the dough onto a floured surface and knead it for about 5-10 minutes until it becomes smooth and elastic. Make sure to incorporate enough flour to prevent sticking. Kneading helps develop the gluten structure essential for the perfect texture in your red velvet cinnamon rolls.
Step 6: Let the Dough Rise
Place the kneaded dough in a greased bowl and cover it with a cloth. Let it rise in a warm area for approximately 1 hour or until it doubles in size. This step is vital for achieving a fluffy and airy texture in your cinnamon rolls, so resist the temptation to rush it!
Step 7: Roll Out the Dough
Once the dough has risen, punch it down gently and roll it out on a floured surface into a rectangle about ¼ inch thick. Aim for an even thickness to ensure uniform baking. This is where the magic begins, as you prep your dough for that delicious cinnamon-and-sugar filling.
Step 8: Add the Filling
Spread softened butter over the rolled-out dough, followed by a generous sprinkle of cinnamon. Carefully roll the dough into a tight log starting from one edge. This will create those delicious swirls we love in red velvet cinnamon rolls. Aim for a uniform roll to ensure all pieces bake evenly.
Step 9: Slice the Rolls
Using a sharp knife or dental floss, cut the rolled log into 12 equal pieces. Place these pieces in a greased baking dish, cut side up, ensuring there's enough space between them to rise. The anticipation builds as you prepare to transform these beautiful pieces into warm, fluffy rolls!
Step 10: Second Rise
Cover the sliced rolls with a cloth and let them rise for another 30 minutes. During this time, they should puff up nicely. This second rise is crucial for achieving that light, airy texture that pairs perfectly with the decadent cream cheese frosting.
Step 11: Preheat the Oven
While the rolls are rising, preheat your oven to 350°F (175°C). This ensures that your red velvet cinnamon rolls start baking at the right temperature, contributing to their wonderful golden-brown color and soft texture once they’re done.
Step 12: Bake the Rolls
Once the oven is preheated, bake the cinnamon rolls for 25-30 minutes or until golden brown and cooked through. Keep an eye on them, as different ovens can vary in temperature. If they're browning too quickly, feel free to cover them loosely with foil for the last few minutes of baking.
Step 13: Prepare the Frosting
While the cinnamon rolls are baking, prepare the cream cheese frosting by mixing together ½ cup of softened cream cheese, 2 tablespoons of softened butter, ½ cup of powdered sugar, and 1 teaspoon of milk in a bowl. Beat until smooth and creamy; this luscious frosting will perfectly complement your warm red velvet cinnamon rolls.
Step 14: Frost the Rolls
Once the rolls have baked, allow them to cool slightly before generously spreading the cream cheese frosting on top. The warmth of the rolls will make the frosting melt slightly, creating an irresistible topping that enhances the flavor and visual appeal of your red velvet cinnamon rolls.

Expert Tips for Red Velvet Cinnamon Rolls
-
Froth the Yeast: Use warm milk, around 110°F, to activate the yeast correctly—too hot or too cold can prevent proper rising.
-
Knead Well: Make sure you knead the dough until it's smooth and elastic; this helps to develop gluten for a perfect texture in your red velvet cinnamon rolls.
-
Measure Accurately: When measuring flour, spoon it into the cup and level it off with a knife to avoid dense rolls from too much flour.
-
Patience with Rising: Allow the dough to rise until it doubles in size—this step is essential for fluffy cinnamon rolls, so don't rush it!
-
Avoid Overbaking: Keep a close eye on your rolls while baking; they should be golden brown but not overly dark, ensuring a tender bite.
-
Frost Warm Rolls: Spread your cream cheese frosting on warm rolls for a delightful melt-in-your-mouth experience that elevates flavor and texture!
How to Store and Freeze Red Velvet Cinnamon Rolls
Room Temperature: Keep fresh rolls at room temperature in an airtight container for up to 3 days to maintain their soft texture.
Fridge: For longer storage, place your red velvet cinnamon rolls in the fridge, where they can last up to a week. Just be sure to cover them tightly!
Freezer: You can freeze unbaked rolls by placing them in a greased dish and covering tightly with plastic wrap. They’ll stay good for up to 3 months. To bake, let them thaw in the fridge overnight before allowing them to rise and bake.
Reheating: Warm leftover rolls in the microwave for 10-15 seconds or in a preheated oven at 350°F (175°C) for about 5-10 minutes to bring back their freshness!
What to Serve with Red Velvet Cinnamon Rolls
Nothing complements the rich sweetness of these delightful rolls quite like the perfect side dishes or beverages.
-
Fresh Fruit Salad: Bright, juicy fruits add a refreshing contrast to the sweetness of the rolls, balancing the meal beautifully.
-
Savory Quiche: A light, fluffy quiche provides a savory counterpoint, making for a well-rounded brunch spread that guests will adore.
-
Crispy Bacon: The salty crunch of bacon pairs wonderfully with the sweetness of red velvet cinnamon rolls, creating a delightful flavor harmony.
-
Creamy Coffee: A smooth, rich cup of coffee or latte enhances the indulgent flavors while providing a comforting warmth to the breakfast table.
-
Maple Syrup Drizzle: A touch of maple syrup adds an extra layer of flavor, making each bite of the cinnamon rolls even more irresistible.
-
Ice Cream Scoops: Serving warm rolls with a scoop of vanilla ice cream transforms your dessert into an unforgettable treat, perfect for special occasions.
For a touch of elegance, consider pairing these rolls with a glass of chilled sparkling wine to elevate the experience into a festive celebration!
Make Ahead Options
These delightful Red Velvet Cinnamon Rolls are perfect for meal prep lovers! You can prepare the dough up to 24 hours in advance. Simply follow the recipe instructions up to the second rise (step 10), then cover the rolls tightly in plastic wrap and refrigerate. This allows them to develop even more flavor overnight! When you’re ready to bake, just let them sit at room temperature for about 30 minutes while you preheat your oven. For extra convenience, the cream cheese frosting can be made up to 3 days in advance and stored in the refrigerator. Just frost the warm rolls before serving for a fresh and delicious treat that’s just as tasty as when made on the same day!
Red Velvet Cinnamon Rolls Variations
Customize your red velvet cinnamon rolls to create something uniquely delicious that will tantalize your senses!
-
Nutty Delight: Add ½ cup of chopped pecans or walnuts into the filling for a crunchy texture that contrasts beautifully with the soft dough.
-
Spiced Up: Sprinkle in some nutmeg or cardamom along with the cinnamon for an aromatic warmth that elevates the flavor profile.
-
Cocoa Lovers: Swap in dark cocoa powder instead of the regular for a deeper chocolate flavor that enhances that red velvet experience.
-
Gluten-Free: Use a gluten-free flour blend to make these rolls accessible without sacrificing taste. Just be sure to include xanthan gum if your blend doesn't already have it!
-
Sweet and Sour: For a fun twist, fold in a handful of dried cherries or cranberries to introduce a tarty flavor that complements the sweetness.
-
Red Velvet Roll-Ups: Instead of making traditional rolls, spread the dough with cream cheese, roll it up, and slice into pinwheels for a delightful take on a classic!
-
Frosting Variations: Experiment with your frosting by adding a splash of almond extract or a swirl of melted chocolate for extra richness. You could also try my easy recipe for vanilla buttercream to change it up!
-
Add Heat: For those who love a kick, sprinkle in a bit of cayenne pepper or crushed red pepper flakes into the filling: it adds a surprising yet delightful zing!
Feel free to mix and match these ideas to create a batch that perfectly suits your tastes. Happy baking!

Red Velvet Cinnamon Rolls Recipe FAQs
How do I choose ripe ingredients for my Red Velvet Cinnamon Rolls?
Absolutely! For the best results, ensure your butter is softened to room temperature, which makes it easier to blend with other ingredients. When selecting eggs, make sure they're fresh and large, as they contribute to the texture of the rolls. As for milk, use whole milk for creaminess. And if you're using food coloring, go for gel or high-quality liquid for the most vibrant color.
What is the best way to store my Red Velvet Cinnamon Rolls?
Very! Store your freshly baked rolls at room temperature in an airtight container for up to 3 days. If you want to keep them longer, you can refrigerate them in a tightly covered container, where they will stay fresh for up to a week. Just be aware that refrigeration can slightly alter their texture.
Can I freeze Red Velvet Cinnamon Rolls?
Definitely! You can freeze unbaked rolls by placing them in a greased dish, covering them tightly with plastic wrap, and then with aluminum foil. They can be frozen for up to 3 months. To bake, let them thaw in the fridge overnight, then allow them to rise at room temperature for about 30 minutes before baking.
What should I do if my dough doesn’t rise?
Very important! If your dough fails to rise, it’s usually due to inactive yeast. Make sure your yeast is fresh—check the expiration date. Also, the milk used to activate the yeast should be warm but not hot, around 110°F. If your first rise didn’t happen, you can try mixing in a little bit of warm water with more yeast to revive it, but be sure to knead it again before the second rise.
Are these Red Velvet Cinnamon Rolls suitable for a gluten-free diet?
You bet! To make gluten-free red velvet cinnamon rolls, substitute the all-purpose flour with a gluten-free blend. Make sure the blend contains xanthan gum, as it helps with structure. Keep in mind that the texture might be slightly different but is still delicious!
Can my pets eat Red Velvet Cinnamon Rolls?
No, it’s better to keep these rolls away from pets. Ingredients like sugars, chocolate cocoa, and certain dairy products may be harmful to them. If you'd like to treat your furry friends, a simple peanut butter biscuit is a much safer alternative!
Irresistibly Soft Red Velvet Cinnamon Rolls You’ll Crave
Equipment
- mixing bowl
- Rolling Pin
- baking dish
- Oven
Ingredients
For the Dough
- 4 cups all-purpose flour This is the foundation of your rolls, providing that soft, chewy texture.
- 1 cup milk Warm milk helps activate the yeast for a fluffy rise.
- ½ cup sugar Sweetens the dough and balances the cocoa's bitterness.
- ¼ cup unsweetened cocoa powder Adds a rich chocolate flavor to our red velvet cinnamon rolls!
- ½ cup unsalted butter, softened Infuses richness and moisture into the dough.
- 2 large eggs Acts as a binding agent, creating that lovely structure.
- 1 teaspoon vanilla extract Enhances the overall flavor profile beautifully.
- ½ teaspoon salt Brings out the sweet and rich flavors in the rolls.
- ¼ teaspoon baking soda Helps with texture and promotes the perfect rise.
- 1 tablespoon active dry yeast Essential for that delightful fluffiness!
For the Cream Cheese Frosting
- ½ cup cream cheese, softened Provides a creamy texture and tangy flavor.
- 2 tablespoons butter, softened Adds richness to the frosting.
- ½ cup powdered sugar Sweetens the frosting and adds a smooth finish.
- 1 teaspoon milk Adjusts the consistency for perfect spreading.
For the Red Color
- 2 tablespoons red food coloring This key ingredient gives your rolls that signature red velvet appearance!
Instructions
Step-by-Step Instructions for Red Velvet Cinnamon Rolls
- Activate the Yeast: Dissolve 1 tablespoon of active dry yeast in 1 cup of warm milk (about 110°F). Let sit for about 5 minutes until foamy.
- Combine Dry Ingredients: In a bowl, whisk together 4 cups of flour, ½ cup of sugar, ¼ cup cocoa powder, and ½ teaspoon salt.
- Mix Wet Ingredients: Add ½ cup butter, 2 eggs, 1 teaspoon vanilla extract, and 2 tablespoons red food coloring to dry ingredients. Mix until a batter forms.
- Incorporate the Yeast Mixture: Pour the activated yeast mixture into the dry and wet ingredients. Stir until a soft dough forms.
- Knead the Dough: Transfer the dough to a floured surface and knead for 5-10 minutes until smooth and elastic.
- Let the Dough Rise: Place the dough in a greased bowl, cover with a cloth, and let rise for about 1 hour or until doubled in size.
- Roll Out the Dough: Punch down the dough, then roll it out on a floured surface into a rectangle about ¼ inch thick.
- Add the Filling: Spread softened butter over the dough, sprinkle with cinnamon, and roll the dough into a tight log.
- Slice the Rolls: Cut the log into 12 equal pieces and place in a greased baking dish, cut side up.
- Second Rise: Cover the rolls with a cloth and let rise for another 30 minutes.
- Preheat the Oven: Preheat your oven to 350°F (175°C).
- Bake the Rolls: Bake for 25-30 minutes or until golden brown and cooked through.
- Prepare the Frosting: Mix together ½ cup cream cheese, 2 tablespoons butter, ½ cup powdered sugar, and 1 teaspoon milk until smooth.
- Frost the Rolls: Allow the rolls to cool slightly before spreading the cream cheese frosting on top.


Leave a Reply