
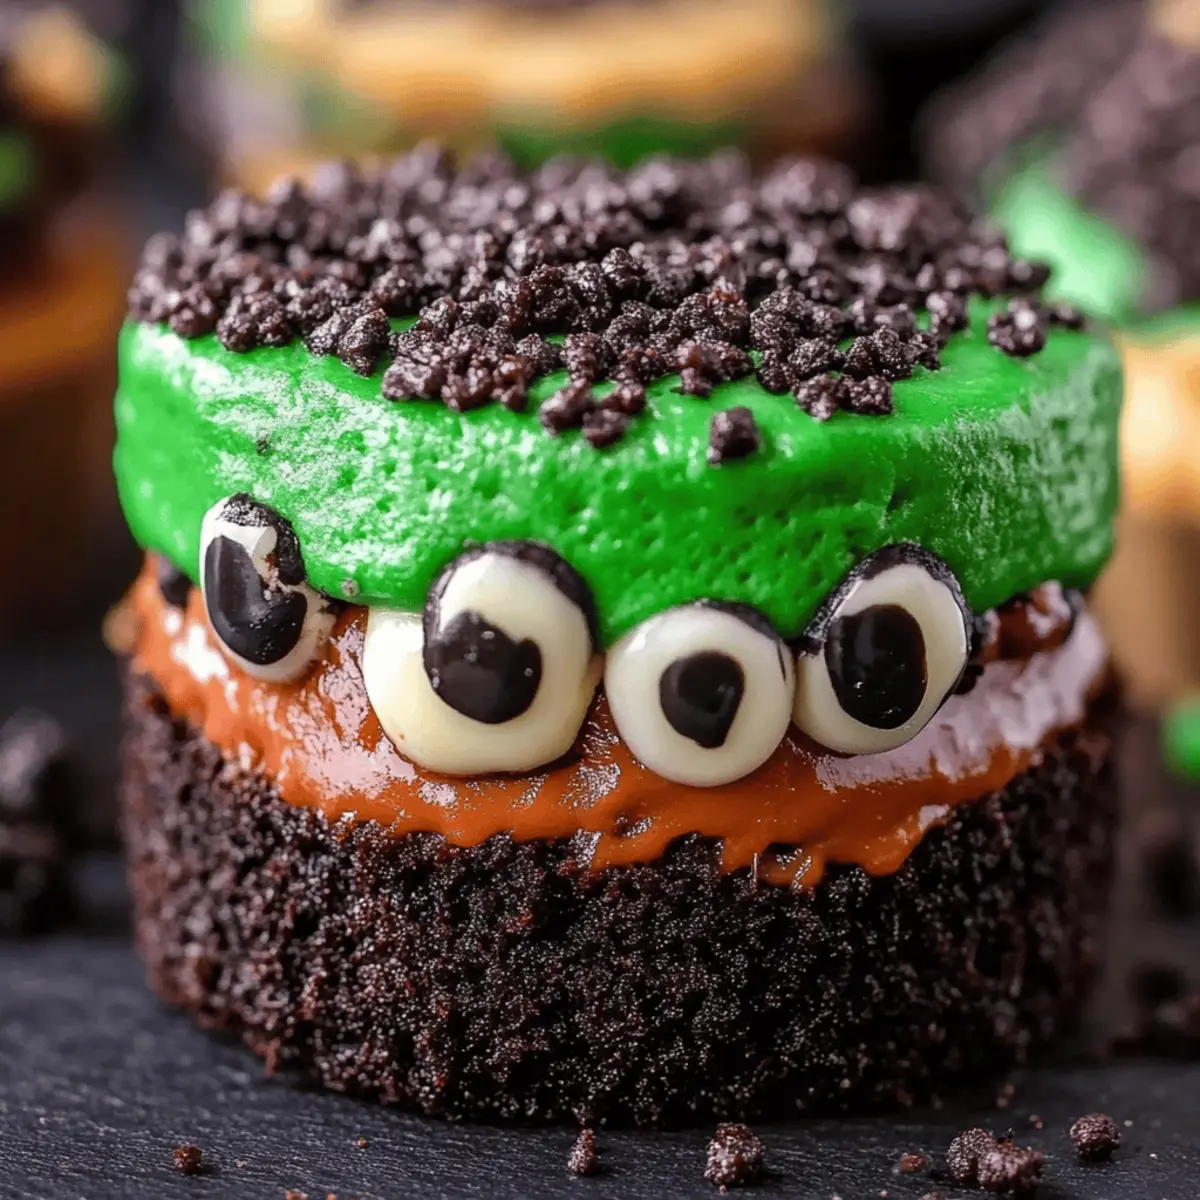
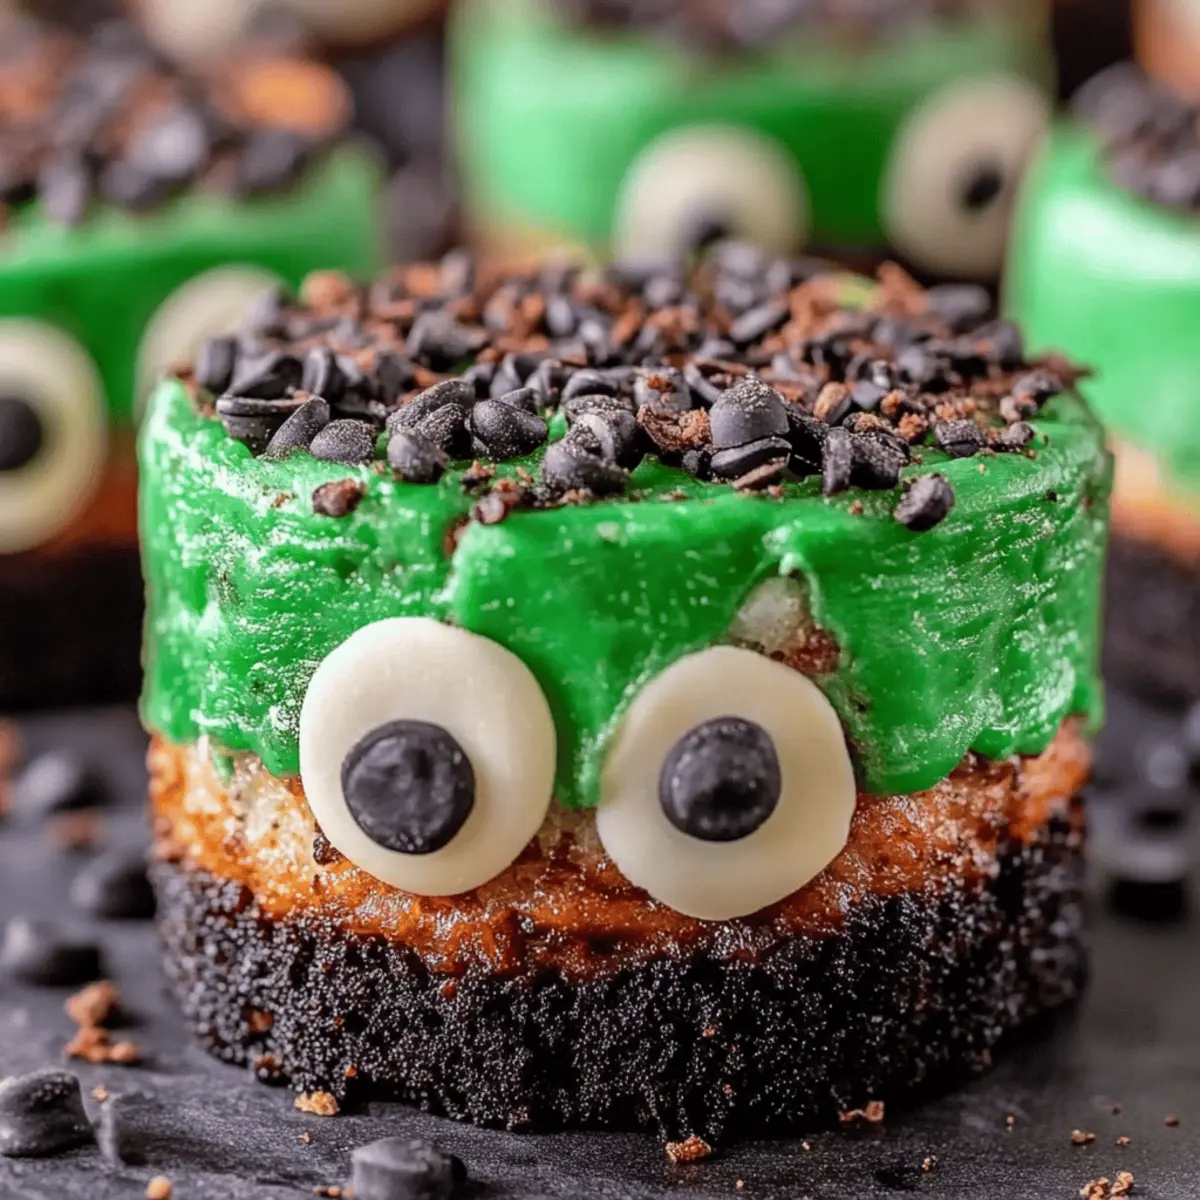
As I rummaged through the pantry, a burst of inspiration hit me like a bolt of lightning. Halloween was just around the corner, and I needed a fun treat that would delight both kids and adults alike. Enter my Frankenstein Mini Cheesecakes—a spooky twist on a classic dessert! With their vibrant green hue and playful decorations, these mini cheesecakes are not only a feast for the eyes but also a breeze to prepare. In just 15 minutes of prep, you’ll create a crowd-pleaser that’s perfect for any festive gathering. Plus, they are simple enough that even the little ones can join in the fun of decorating! Are you ready to whip up a batch of these monstrous delights that will leave everyone asking for seconds?
Why Are Frankenstein Mini Cheesecakes a Must-Try?
Playful and tempting: These Frankenstein Mini Cheesecakes beautifully combine fun with flavor, making them the perfect treat for your Halloween festivities.
Quick to make: With just 15 minutes of prep time, they’re a speedy way to whip up a delicious dessert.
A showstopper: Their vibrant green color and quirky decorations will surely impress guests of all ages, making you the star of the party.
Kid-friendly: Invite the little ones to help with decorating—they’ll love creating their own spooky masterpieces!
Versatile: Celebrate Halloween or any occasion with these easy-to-customize cheesecakes. For more mini dessert ideas, check out our Mini Cheesecake Variations.
Delicious flavor: Smooth cream cheese and sweet OREO crust create a delectable treat that balances sweetness and fun. Your guests won't be able to resist going back for more!
Frankenstein Mini Cheesecakes Ingredients
For the Cheesecake Filling
- Cream cheese – 16 ounces, softened for the smoothest, creamiest filling.
- Sugar – 1 cup to add sweetness and balance with the tangy cream cheese.
- Eggs – 3 large eggs to give the cheesecake its structure and richness.
- Flour – 2 tablespoons to help set the filling and create a nice texture.
- Vanilla extract – 1 ½ teaspoons for that warm, inviting flavor that enhances the cheesecake.
- Green food coloring – 20 drops, adjust for the perfect spooky shade!
For the Crust
- OREO cookies – 24 cookies, crushed (about 2 cups) to create a deliciously chocolatey base.
- Butter – 2 tablespoons, melted to bind the crumbs and create a rich crust texture.
For Decoration
- Edible eyes – 32 to bring your Frankenstein creations to life with playful character!
- Chocolate chips – 1 cup, melted to add drizzled detailing and flavor to the decorations.
- Chocolate sprinkles – 1 cup to give a festive, fun touch to your spooky cheesecakes.
- Chocolate chips – 32 for additional facial features and a delightful crunch.
These Frankenstein Mini Cheesecakes are more than just a dessert; they're a treat that brings joy, creativity, and delicious flavors to your Halloween celebrations!
Step‑by‑Step Instructions for Frankenstein Mini Cheesecakes
Step 1: Preheat the Oven
Begin by preheating your oven to 350°F (175°C). This ensures your Frankenstein Mini Cheesecakes will bake evenly, creating that perfect creamy texture. While the oven warms up, gather your ingredients and equipment, such as a mini cheesecake pan, mixing bowls, and a hand mixer.
Step 2: Prepare the Crust
Melt 2 tablespoons of butter and combine it with 24 crushed OREO cookies in a mixing bowl. Stir until the cookie crumbs are nicely coated and resemble wet sand. This mixture will serve as the delicious base for your cheesecakes.
Step 3: Form the Crust
Using your hands, form the cookie mixture into 1-inch balls and firmly place them into each cavity of the mini cheesecake pan. Make sure they are evenly distributed for consistent baking.
Step 4: Press the Crust
Take a tamper or the back of a measuring spoon and press each cookie ball down firmly into the bottom of the pan. Aim for a flat, even layer, which will serve as the sturdy foundation for your creamy cheesecake filling.
Step 5: Make the Cheesecake Filling
In a large mixing bowl, beat together 16 ounces of softened cream cheese, 1 cup of sugar, 3 eggs, and 1 ½ teaspoons of vanilla extract using a hand mixer. Mix until the mixture is smooth and free of lumps, about 2-3 minutes on medium speed.
Step 6: Incorporate the Flour
Slowly add 2 tablespoons of flour into the cream cheese mixture while continuing to mix on low speed. This helps create a perfectly rich and creamy filling. Ensure the flour is fully incorporated before moving on to the next step.
Step 7: Add Food Coloring
Next, add approximately 20 drops of green food coloring to the filling, stirring gently. Continue to adjust until you achieve the desired vibrant green hue that makes these Frankenstein Mini Cheesecakes truly festive.
Step 8: Fill the Pan
Carefully pour the green cheesecake mixture over the cookie crusts in each cavity of the mini cheesecake pan. Fill each one almost to the top, leaving a small gap for expansion. This will allow for a perfect mini cheesecake experience.
Step 9: Bake the Cheesecakes
Place the filled mini cheesecake pan into your preheated oven and bake for about 15 minutes. You’ll know they’re ready when the edges are set, but the centers still have a slight jiggle. This ensures they will be creamy once cooled.
Step 10: Cool Completely
After baking, carefully remove the pan from the oven and let the cheesecakes cool at room temperature. Allow them to cool completely for about 1 hour before transferring them to the fridge to chill for at least 30 minutes, which helps them set perfectly.
Step 11: Remove and Decorate
Once cooled, gently remove the mini cheesecakes from the tin by pressing up from the bottom. Now, let your creativity shine! Drizzle each cheesecake with melted chocolate and sprinkle with chocolate sprinkles for a festive look.
Step 12: Add Fun Features
To finalize your Frankenstein Mini Cheesecakes, pipe additional melted chocolate onto each for eyes, mouth, and other features. Attach edible eyes and chocolate chips to create the final ghastly and fun decorations that everyone will adore!

Frankenstein Mini Cheesecake Variations
Feel free to let your creativity shine as you personalize these delightful treats with fun twists and substitutions!
-
Dairy-Free: Substitute cream cheese with a plant-based cream cheese alternative to keep it creamy and delicious.
-
Gluten-Free: Use gluten-free cookies instead of OREOs in the crust for a safe but equally scrumptious option.
-
Sugar-Free: Try a sugar substitute like erythritol for a guilt-free version that still satisfies your sweet tooth.
-
Flavor Explosion: Add a teaspoon of mint or almond extract to the filling for an unexpected but tasty flavor twist.
-
Spicy Kick: Mix in a pinch of cayenne or cinnamon to the crust for a warm, spicy undertone that contrast beautifully with the sweet filling.
-
Fruit Surprise: Incorporate some finely chopped fruit like strawberries or raspberries into the cheesecake mixture for a refreshing burst of flavor.
-
Decadent Chocolate: Swirl in some chocolate ganache or add cocoa powder to the filling for an even richer chocolate experience.
-
Ultimate Toppings: Top with whipped cream, caramel sauce, or a generous drizzle of peanut butter for a new layer of deliciousness! Consider pairing these with your favorite mini desserts, like our Mini Cheesecake Variations for a feast that never stops!
What to Serve with Frankenstein Mini Cheesecakes?
Want to impress your guests with a delightful spread that complements your spooky cheesecakes?
- Crispy Apple Slices: Fresh, juicy apples offer a satisfying crunch that balances the richness of the cheesecakes.
- Savory Cheese Platter: Include a variety of cheeses for a delightful contrast to the sweetness, paired with crackers for added texture.
- Pumpkin Spice Whipped Cream: A dollop of this spice-infused cream is a festive and flavorful addition to each cheesecake slice.
- Chocolate Milkshake: This thick and creamy beverage echoes the chocolatey elements in the cheesecakes and feels like a nostalgic treat.
- Spooky Fruit Salad: Create a colorful mix of seasonal fruits to add freshness and a burst of flavor to your Halloween lineup.
- Ginger Snap Cookies: Their spiced crunch provides a fun texture contrast, perfect alongside the creamy cheesecakes' sweetness.
- Spiced Apple Cider: Warm or cold, this drink brings comforting flavors that mesh beautifully with the dessert's sweetness.
- Pecan Pie Bars: Rich, nutty bars offer a sense of indulgence, making for a perfect sweet pairing that guests will love.
- Monster Marshmallow Pops: Fun, decorative treats that kids and adults will enjoy—perfect for enhancing the festive atmosphere.
- Dark Chocolate Lava Cake: For those seeking a decadent experience, this molten dessert creates an exciting contrast to the mini cheesecakes.
How to Store and Freeze Frankenstein Mini Cheesecakes
Fridge: Store your Frankenstein Mini Cheesecakes in an airtight container for up to 3 days. Make sure they are completely cooled before sealing to prevent moisture buildup.
Freezer: If you want to make them ahead, freeze the cheesecakes in a single layer on a baking sheet for about 1 hour. Once solid, transfer them to a freezer-safe container for up to 1 month.
Thawing: To enjoy your frozen cheesecakes, simply transfer them to the fridge to thaw overnight before serving.
Reheating: These cheesecakes are best enjoyed cold, so no reheating is necessary! Just bring them out a little while before serving to reach a perfect texture.
Expert Tips for Frankenstein Mini Cheesecakes
Mix Thoroughly: Make sure to beat the cream cheese and sugar until completely smooth to avoid lumps. A well-mixed filling helps create a creamy texture in your Frankenstein Mini Cheesecakes.
Color Gradually: When adding green food coloring, start with fewer drops and mix well before adding more. This ensures you achieve your desired spooky green hue without going overboard.
Press Firmly: When creating the cookie crust, press the mixture firmly into the pan. This helps the crust hold together during baking and makes for a sturdy base.
Bake with Care: Keep a close eye on the cheesecakes as they bake. They should be slightly jiggly in the center to ensure they're creamy after cooling—overbaking can lead to a dry texture.
Chill Properly: Allow the cheesecakes to cool completely before refrigerating. This step is crucial for setting the filling correctly and achieving the perfect slice when serving.
Make Ahead Options
These Frankenstein Mini Cheesecakes are perfect for busy home cooks looking to save time! You can prepare the crust by mixing the crushed OREO cookies with melted butter up to 24 hours in advance; simply refrigerate the mixture until you're ready to form them into crusts. Additionally, you can make the cheesecake filling, store it in an airtight container, and refrigerate it for up to 3 days. When you're ready to bake, just fill the crusts with the chilled cheesecake mixture and bake as directed. This way, your delicious cheesecakes will be just as creamy and delightful, keeping the fun alive with minimal effort during your next gathering!
Frankenstein Mini Cheesecakes Recipe FAQs
How do I choose ripe ingredients for my Frankenstein Mini Cheesecakes?
Absolutely! For the best flavor, use fresh cream cheese that’s been softened to room temperature. It should have a smooth, spreadable texture without any lumps. If your eggs are chilled, let them sit at room temperature for about 30 minutes for better mixing.
What’s the best way to store leftover cheesecakes?
Very! Store your Frankenstein Mini Cheesecakes in an airtight container in the refrigerator for up to 3 days. Ensure they are completely cooled before sealing. If you notice any condensation inside the container, wipe it away to prevent sogginess.
Can I freeze the cheesecakes, and how should I do it?
Of course! To freeze your Frankenstein Mini Cheesecakes, lay them out on a baking sheet and freeze for about 1 hour until solid. Then, transfer them to a freezer-safe container or wrap them tightly in plastic wrap. They can be kept frozen for up to 3 months.
What should I do if my cheesecakes are too jiggly after baking?
You may have underbaked them slightly, which can happen if you didn’t allow the edges to set properly. If this happens, gently return them to the oven and bake for an extra 2-3 minutes, just until the edges are firm but the centers still jiggle slightly. Remember, they will firm up more as they cool!
Are there any dietary considerations I should keep in mind?
Definitely! If you have gluten allergies, you can replace the OREO cookies with gluten-free cookies or graham crackers. For those with dairy sensitivities, try using a dairy-free cream cheese alternative. And remember, these cheesecakes are not suitable for pets due to chocolate and sugar content.
How can I make these cheesecakes without sugar?
Absolutely! For a sugar-free version, substitute the sugar with a sweetener like erythritol or stevia. You may need to experiment with the amount since sweeteners can vary in potency. Also, make sure your cream cheese and chocolate chips are sugar-free for an enjoyable guilt-free treat!
Frankenstein Mini Cheesecakes That Steal the Show
Equipment
- mini cheesecake pan
- mixing bowls
- Hand mixer
Ingredients
For the Cheesecake Filling
- 16 ounces Cream cheese softened
- 1 cup Sugar
- 3 large Eggs
- 2 tablespoons Flour
- 1.5 teaspoons Vanilla extract
- 20 drops Green food coloring adjust for desired shade
For the Crust
- 24 cookies OREO cookies crushed (about 2 cups)
- 2 tablespoons Butter melted
For Decoration
- 32 Edible eyes
- 1 cup Chocolate chips melted
- 1 cup Chocolate sprinkles
- 32 Chocolate chips for additional features
Instructions
Step‑by‑Step Instructions
- Preheat your oven to 350°F (175°C). Gather your ingredients and equipment.
- Melt 2 tablespoons of butter and mix with 24 crushed OREO cookies.
- Form the cookie mixture into 1-inch balls and place them into the mini cheesecake pan.
- Press each cookie ball down firmly into the bottom of the pan.
- Beat together cream cheese, sugar, eggs, and vanilla extract until smooth.
- Slowly add flour to the cream cheese mixture while mixing on low speed.
- Add green food coloring to the filling and stir gently until the desired color is achieved.
- Pour the green cheesecake mixture over the crusts in the pan, filling them almost to the top.
- Bake for about 15 minutes until edges are set and centers jiggle slightly.
- Cool at room temperature for 1 hour, then refrigerate for at least 30 minutes.
- Remove cheesecakes from the tin and decorate with melted chocolate and sprinkles.
- Pipe additional melted chocolate for features and attach edible eyes and chocolate chips.


Leave a Reply