
The aroma of chocolate and vanilla fills the air as I pull my Spooky Halloween Marble Cake from the oven, and there’s something delightfully eerie about this treat. Perfect for your upcoming gatherings, this cake not only captivates the eyes with its haunting hues but is also a fun way to welcome the spirit of Halloween into your home. With its quick preparation time and a delightful twist on classic cake, it's a guaranteed crowd-pleaser that will have everyone singing your praises—no tricks here! Imagine the joy on your friends’ faces as they indulge in layers of rich flavors and spooky decorations, making this the perfect centerpiece for your festive celebrations. Ready to create a show-stopping dessert that delights both young and old? Let’s dive into this deliciously haunting recipe!
Why is this cake a Halloween hit?
Show-Stopping Surprise your guests with a visually stunning cake that not only looks eerie but tastes incredible.
Boo-tiful Flavors The combination of chocolate and red candy melts creates a rich and festive flavor experience that will have everyone wanting more.
Easy to Make Even if you’re not a pro in the kitchen, this cake is approachable and fun; perfect for bakers of all skill levels.
Versatile Décor Customize your spooky themes with bloody sprinkles or playful toppings to match your Halloween party vibe.
Crowd-Pleaser With enough servings for 12-14, this cake is perfect for sharing at gatherings, ensuring smiles all around.
Time-Saving In just over two hours, you’ll have a delightful centerpiece that’s equally delicious and Instagram-worthy—ideal for your next get-together. Want more tips for Halloween baking? Check out our guide on spooky treats!
Spooky Halloween Marble Cake Ingredients
For the Cake
• All-purpose flour – This gives the cake structure and lightness, ensuring a fluffy texture.
• Baking powder – Essential for helping the cake rise and achieve that perfect fluffy crumb.
• Baking soda – This helps balance acidity and adds to the cake's leavening properties.
• Salt – Enhances the flavors of the other ingredients, balancing the sweetness.
• Unsalted butter – Brings richness and moisture; make sure it’s at room temperature for easy creaming.
• Granulated sugar – Adds sweetness while contributing to the cake’s moisture and texture.
• Vanilla extract – Infuses enchanting flavor, making each bite delightful.
• Large eggs – Helps bind the ingredients together and adds to the cake's fluffiness.
• Buttermilk – Ensures a tender crumb and adds a slight tang, enhancing the flavor profile.
• Bittersweet chocolate – Forms the rich, chocolatey swirl, adding depth to the flavors.
For the Decoration
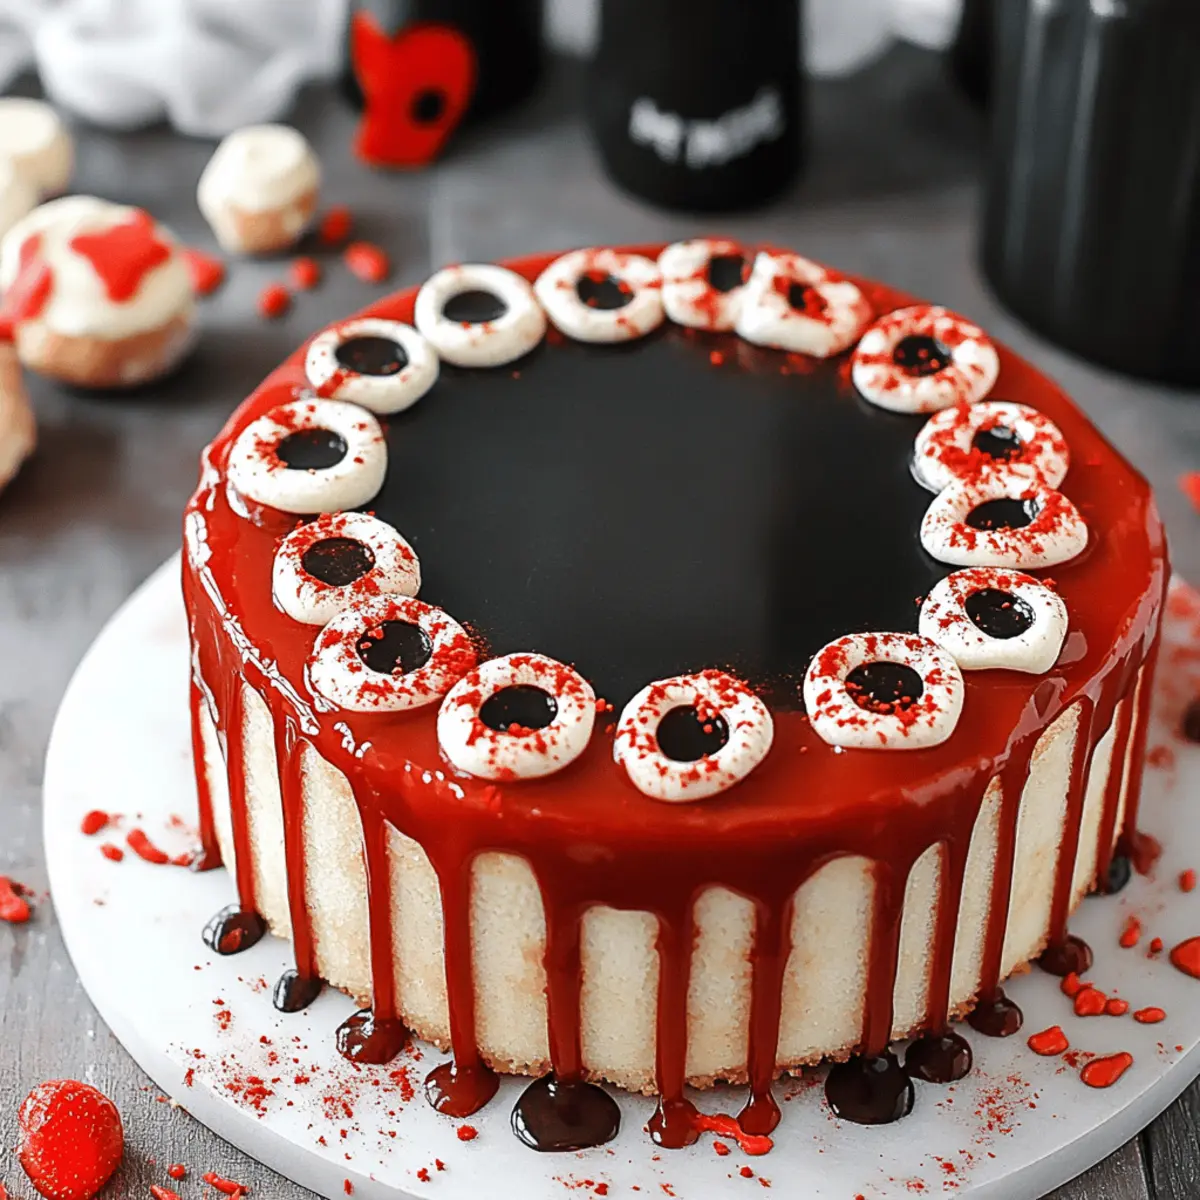
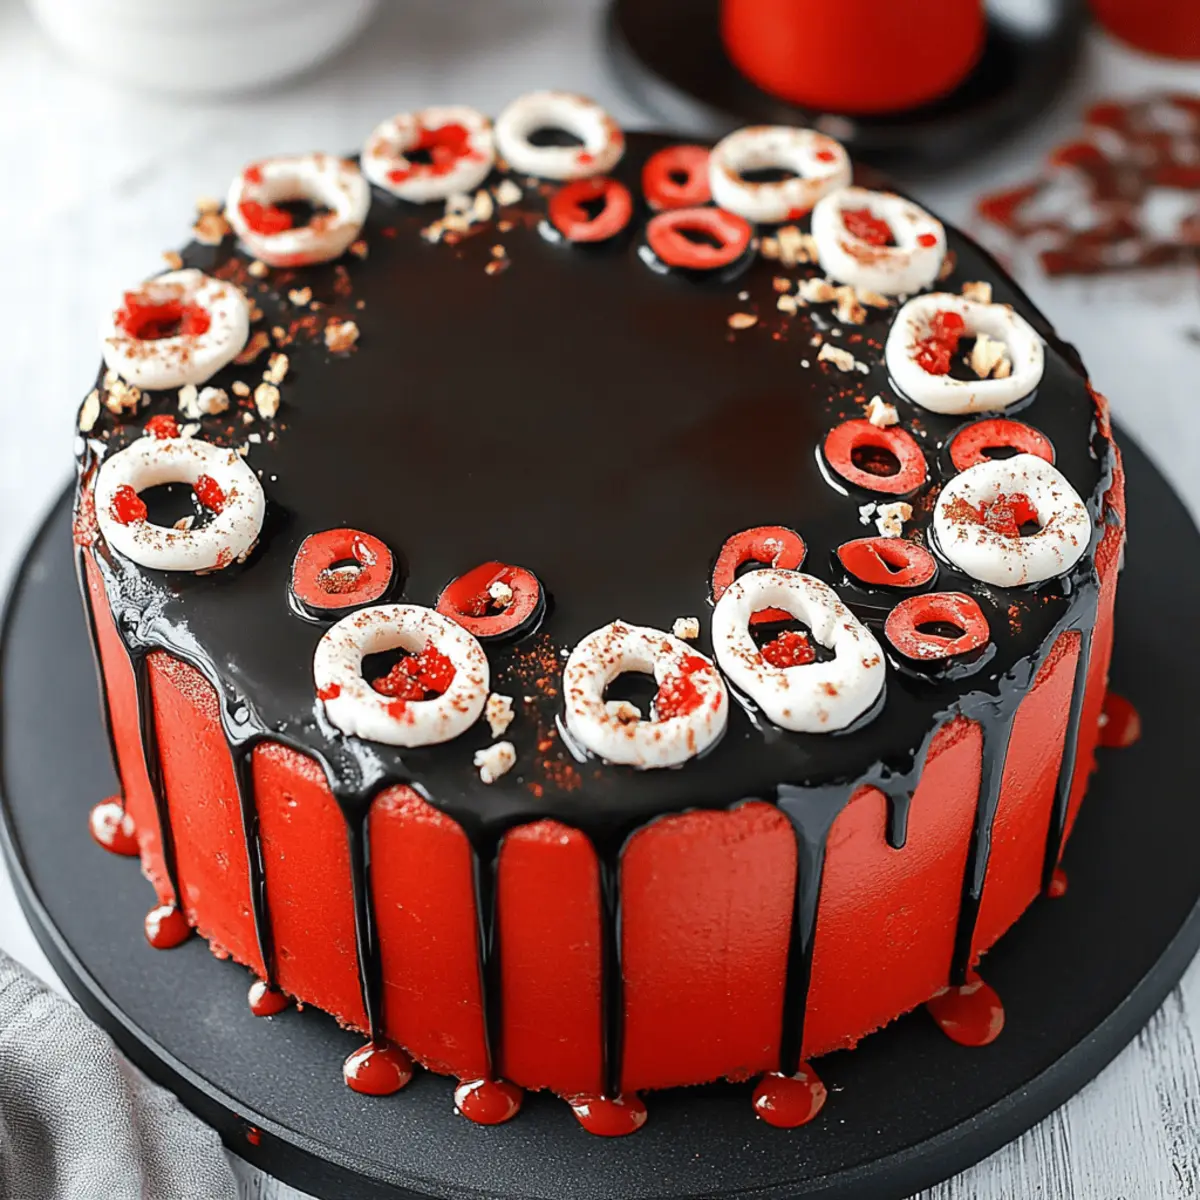
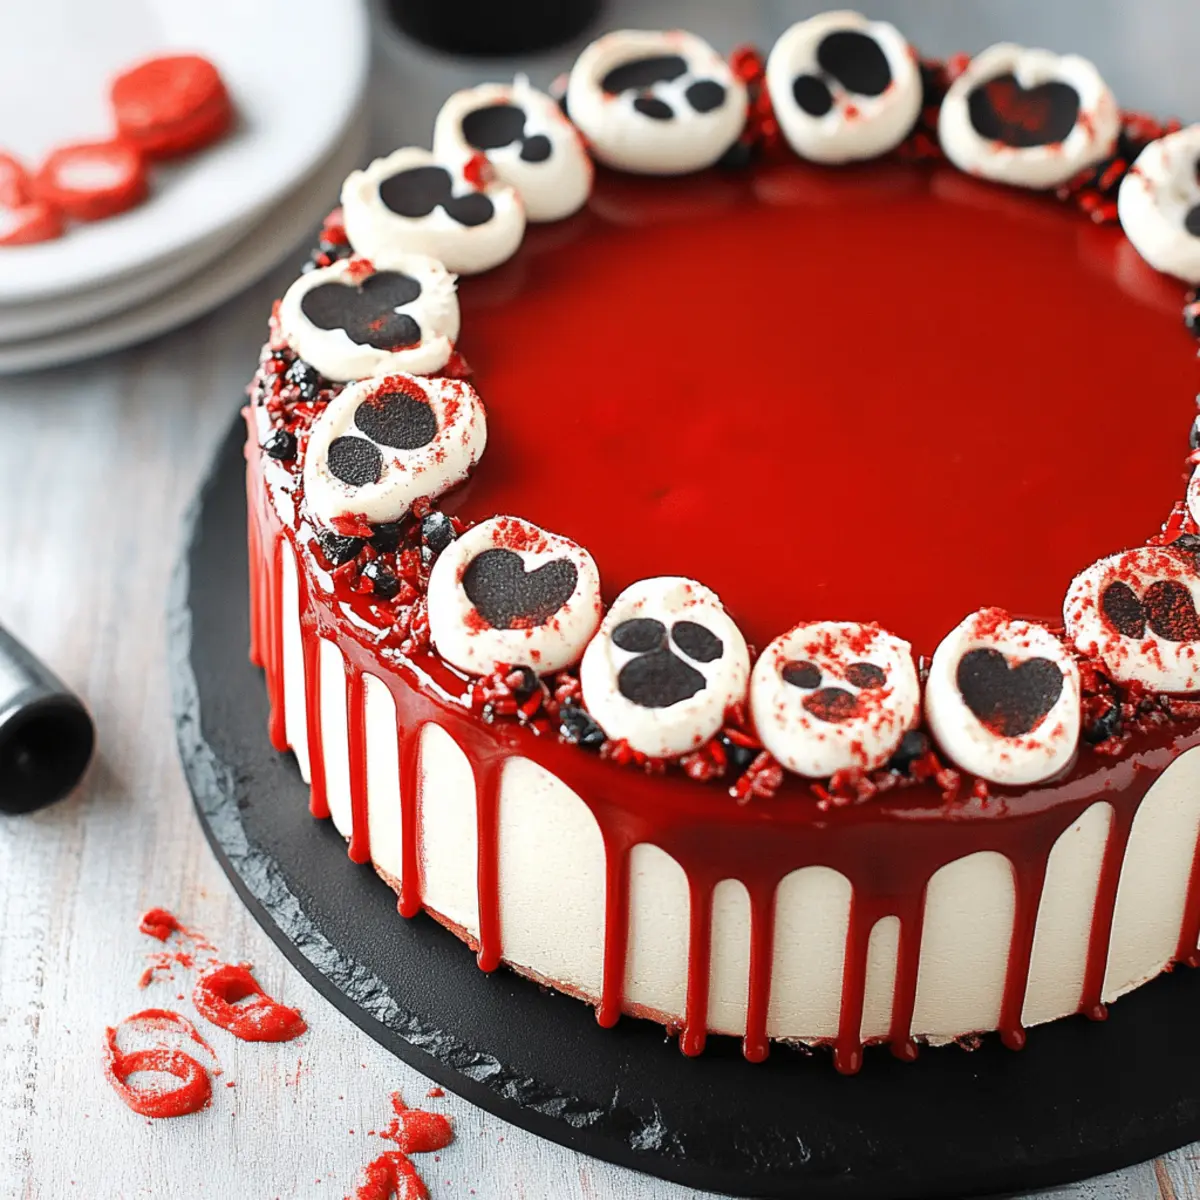
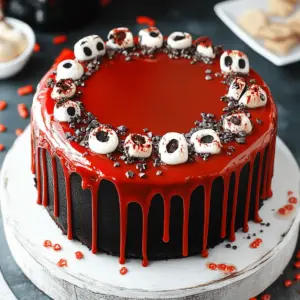
• Red candy melts – These melted candies add a spooky, blood-like drizzle that makes the cake visually striking.
• Black buttercream icing – Perfectly covers the cake and adds an extra layer of sweetness alongside that Halloween flair.
• Black gel icing color – A little goes a long way in achieving a darker icing, perfect for a gothic effect.
• Bloody bones sprinkles – These eerie decorations are the perfect finishing touch for your spooky creation.
• Bloody eyeball sprinkles – Add a playful, horror-themed vibe to your cake design, delighting all ages.
With these ingredients in hand, you're ready to craft the most hauntingly delicious Spooky Halloween Marble Cake that will leave an unforgettable impression!
Step‑by‑Step Instructions for Spooky Halloween Marble Cake
Step 1: Preheat and Prepare
Begin by preheating your oven to 350°F (175°C). While it warms up, grease three 8-inch round cake pans with butter or non-stick spray to ensure easy removal later. Set these prepared pans aside, ready for your delicious Spooky Halloween Marble Cake batter.
Step 2: Mix Dry Ingredients
In a medium bowl, whisk together 2 ¼ cups of all-purpose flour, 2 ½ teaspoons of baking powder, ¼ teaspoon of baking soda, and ½ teaspoon of salt until evenly combined. This mixture will provide the necessary structure to your cake. Once mixed, set the bowl aside to focus on the wet ingredients.
Step 3: Cream Butter and Sugar
In a large mixing bowl, cream together ½ cup of room-temperature unsalted butter and 1 ½ cups of granulated sugar. Use a hand mixer or stand mixer on medium speed for about 4-5 minutes, until the mixture becomes light and fluffy, turning pale in color—a crucial step for a tender cake texture.
Step 4: Incorporate Eggs and Vanilla
Next, beat in 4 large room-temperature eggs one at a time, mixing thoroughly after each addition. Then, add 1 tablespoon of vanilla extract, blending until everything combines seamlessly. This will add a lovely flavor base to your Spooky Halloween Marble Cake.
Step 5: Alternate Dry and Wet Ingredients
Begin adding the flour mixture and 1 cup of room-temperature buttermilk to the butter mixture, alternating between each addition. Start with the flour, mix until just combined, then add the buttermilk, repeating until all are incorporated. This method keeps the batter light and fluffy—essential for a perfect cake.
Step 6: Divide the Batter
Divide the batter evenly into two separate bowls. In one bowl, add the melted bittersweet chocolate, stirring well until fully mixed in. In the second bowl, add red food coloring to achieve your desired spooky hue, blending until it’s vibrant enough to stand out in your marble cake.
Step 7: Create the Marble Effect
To create the signature marbled look, alternately spoon dollops of the red and chocolate batters into your prepared pans. Once the pans are filled with batter, use a knife or skewer to gently swirl the two colors together to create a spooky marbling effect that captures the Halloween spirit.
Step 8: Bake the Cakes
Carefully place the filled pans in your preheated oven and bake for about 20 minutes. Check for doneness by inserting a toothpick in the center—if it comes out clean or with a few crumbs, your cakes are perfectly baked. The edges should pull slightly away from the pan, indicating they are ready.
Step 9: Cool the Cakes
Once baked, remove the cakes from the oven and let them cool in the pans for 10 minutes. Then, carefully transfer the cakes to wire racks to cool completely. This cooling process helps to prevent icing from melting when it’s time to decorate your Spooky Halloween Marble Cake.
Step 10: Frost the Cakes
Once your cakes have completely cooled, it’s time to frost! Generously spread the black buttercream icing over the top and sides of each cake layer, applying a smooth, even coat to create an eerie yet inviting appearance.
Step 11: Add Creepy Drizzle and Decorate
Melt your red candy melts according to package instructions, then drizzle them over the frosted cake for a spooky blood-like effect. For that final eerie touch, sprinkle bloody bones and eyeball decorations across the top. The decorations will not only enhance the visual appeal but also bring festive fun.
Step 12: Serve and Enjoy
Slice your stunning Spooky Halloween Marble Cake and serve it at your gathering. Watch as your guests are mesmerized by both the flavors and the festive presentation, making it the highlight of your Halloween celebration!
What to Serve with Spooky Halloween Marble Cake
As you prepare to serve this hauntingly delicious dessert, consider delightful accompaniments that enhance its spooky vibes and flavors.
-
Witch's Brew Hot Cocoa: This rich and creamy drink warms you up while evoking the cozy spirit of Halloween. Perfect for dipping cake slices!
-
Creepy Coconut Macaroons: Light, chewy, and festively adorned, these coconut treats provide a delightful texture contrast to your marble cake.
-
Graveyard Chocolate Mousse: Indulge in a luscious, dark mousse that perfectly complements the flavors of your Spooky Halloween Marble Cake while adding a ghostly touch.
-
Pumpkin Spice Whipped Cream: A dollop of this seasonal favorite not only adds creaminess but also enhances the festive flavor profile of your cake.
-
Eerie Fruit Salad: Fresh fruits like blackberries and blood oranges offer a refreshing, colorful contrast to the richness of the cake, with a hint of spookiness.
-
Gingerbread Cookies: These spiced delights add a crunchy texture and festive spirit, making them a fun pairing that your guests will enjoy.
-
Bubbling Apple Cider: Serve warm or chilled for a sweet, tangy drink that echoes the flavors of fall and enhances the overall Halloween experience.
-
Chocolate-Covered Pretzels: The salty-sweet balance complements the sweet marble cake and adds an inviting crunch to your dessert table.
-
Freaky Eyeball Truffles: Delight your guests with these whimsical confections that tie in perfectly with the spooky theme and offer rich chocolate flavors.
With these creatively themed pairings, your gathering will be the talk of the town, ensuring everyone leaves with sweet memories and full bellies!
How to Store and Freeze Spooky Halloween Marble Cake
Room Temperature: If you plan to serve the cake within 2 days, keep it covered at room temperature. This helps maintain its moist texture and prevents it from drying out.
Fridge: For longer storage, wrap the cake tightly in plastic wrap and place it in the fridge. It’ll stay fresh for up to 5 days, but be aware that refrigeration may slightly alter the texture.
Freezer: To freeze, slice the cake into individual portions, wrap each piece tightly in plastic wrap, and then place them in an airtight container. It can be frozen for up to 3 months, ensuring your Spooky Halloween Marble Cake is ready for any last-minute cravings.
Reheating: When you're ready to enjoy frozen cake, let it defrost in the fridge overnight. For a warm slice, microwave it for about 10-15 seconds. Enjoy the hauntingly delicious flavors again!
Expert Tips for Spooky Halloween Marble Cake
Use Room Temperature Ingredients: Ensure that your eggs, butter, and buttermilk are at room temperature. This helps create a smooth batter, crucial for your Spooky Halloween Marble Cake's texture.
Don’t Overmix Batter: When combining the wet and dry ingredients, mix just until combined. Overmixing can lead to a dense cake, so fold gently for a lighter crumb.
Turquoise for Color: If the red food coloring isn’t vibrant enough, consider adding a few drops of blue food coloring; this can enhance the overall hue before bakers form that spooky marbling.
Cool Completely: Make sure the cakes are completely cooled before frosting to prevent the icing from melting. This also helps achieve a cleaner finish for your decorations.
Decorative Details: Be creative with designs and placements of the bloody bones and eyeballs; vary their arrangement for a uniquely spooky effect that will impress your guests!
Test for Doneness: Use a toothpick to check if the cakes are fully baked; they should come out clean or with a few moist crumbs to ensure your Spooky Halloween Marble Cake is perfectly baked.
Spooky Halloween Marble Cake Variations
Feel free to play with this recipe and make it uniquely yours—let your creativity shine!
-
Gluten-Free: Substitute 2 ¼ cups of all-purpose flour with a gluten-free blend for a worry-free treat. Your friends will be amazed that gluten-free can taste this good!
-
Dairy-Free: Use plant-based butter and non-dairy milk instead of buttermilk to create a dairy-free version. The flavor remains rich and indulgent, ensuring everyone can enjoy a slice.
-
Chocolate Lover's Delight: For an intensified chocolate flavor, replace half of the all-purpose flour with cocoa powder. Each bite becomes a decadent chocolatey experience that will impress even the toughest critics.
-
Spicy Kick: Add a pinch of cayenne pepper or a splash of chili powder to the red batter for a surprise heat that contrasts beautifully with the sweet chocolate. It’s the perfect twist for adventurous palates!
-
Citrus Zing: Introduce zest from an orange or lemon into the batter for a bright, refreshing note that complements the chocolate. This vibrant addition creates a delightful balance that keeps everyone coming back for more.
-
Nuts & Crunch: Fold in chopped walnuts or almonds into the batter for an unexpected crunch. The added texture beautifully complements the tenderness of the cake, giving every bite a delightful surprise.
-
Boo-tiful Sprinkles: Swap out the bloody bone sprinkles for festive edible glitter or Halloween-themed confetti to give your cake a playful touch. This makes it even more enchanting and perfect for your celebrations!
For additional ideas on enhancing your baking experience or spooky-themed recipes, be sure to explore more on spooky treats and creative Halloween desserts!
Make Ahead Options
Preparing your Spooky Halloween Marble Cake in advance is a fantastic way to save time and reduce stress before the party! You can make the cake layers up to 3 days ahead; simply bake and allow them to cool completely, then wrap each layer tightly in plastic wrap and refrigerate. This keeps the cakes moist and fresh. For decorating, the black buttercream icing can also be made up to 2 days ahead; store it in an airtight container in the fridge. When you're ready to serve, frost the cake and add the spooky red drizzle with candy melts just before presentation to maintain that mouth-watering, eye-catching look. Enjoy the extra time with your guests, rather than in the kitchen!
Spooky Halloween Marble Cake Recipe FAQs
What kind of sugar should I use?
Absolutely! Granulated sugar works best for this Spooky Halloween Marble Cake as it helps create a light and fluffy texture. If you prefer a richer flavor, you could experiment with brown sugar, but it may change the cake's final color and flavor profile slightly.
How do I know when my cake is done baking?
Very important! Check for doneness by inserting a toothpick into the center of the cake. If it comes out clean or with a few moist crumbs, your cake is perfectly baked. If it comes out wet or with batter, give it a few more minutes in the oven and test it again.
Can I freeze the Spooky Halloween Marble Cake?
Absolutely! To freeze your Spooky Halloween Marble Cake, first slice it into individual portions. Wrap each slice tightly in plastic wrap and then place them in an airtight container. This will keep it fresh for up to 3 months. When you're ready to enjoy, defrost in the refrigerator overnight, or microwave for 10-15 seconds if you like it warm.
How should I store the cake after decorating it?
To keep your decorated cake fresh, cover it loosely with plastic wrap to protect the icing without smudging the decorations. Store the cake at room temperature for up to 2 days. If you plan to keep it longer, refrigerate it, but note that this may slightly change the cake's texture.
Can I use gluten-free flour instead of all-purpose flour?
Very good question! Yes, you can use a gluten-free all-purpose flour blend to make this Spooky Halloween Marble Cake. Just ensure that your blend includes xanthan gum to help replicate the elasticity of regular flour. Follow the same measurement and preparation instructions as you would with all-purpose flour.
What can I do if the batter looks too thick?
If your batter seems too thick, try adding an extra tablespoon of buttermilk at a time until it reaches your desired consistency. Keep in mind that the batter should be thick but pourable—this helps create the beautiful marbling effect in your cake!
Spooky Halloween Marble Cake That's Devilishly Delicious
Equipment
- mixing bowls
- Hand mixer
- 3 8-inch round cake pans
- wire racks
Ingredients
For the Cake
- 2.25 cups all-purpose flour This gives the cake structure and lightness.
- 2.5 teaspoons baking powder Essential for helping the cake rise.
- 0.25 teaspoons baking soda Helps balance acidity.
- 0.5 teaspoons salt Enhances other flavors.
- 0.5 cups unsalted butter Brings richness and moisture.
- 1.5 cups granulated sugar Adds sweetness.
- 1 tablespoon vanilla extract Infuses enchanting flavor.
- 4 large eggs Helps bind ingredients.
- 1 cups buttermilk Ensures a tender crumb.
- 1 cups bittersweet chocolate Forms the rich chocolatey swirl.
For the Decoration
- 1 cups red candy melts Adds a spooky drizzle.
- 2 cups black buttercream icing Covers the cake and adds sweetness.
- 1 teaspoon black gel icing color Achieves a darker icing.
- 0.5 cups bloody bones sprinkles Perfect finishing touch.
- 0.5 cups bloody eyeball sprinkles Adds playful horror-themed vibe.
Instructions
Step-by-Step Instructions
- Preheat your oven to 350°F (175°C) and grease three 8-inch round cake pans with butter or non-stick spray.
- Whisk together all-purpose flour, baking powder, baking soda, and salt until even.
- Cream together unsalted butter and granulated sugar until light and fluffy.
- Beat eggs in one at a time, then add vanilla extract, mixing thoroughly.
- Alternate adding the flour mixture and buttermilk until all ingredients are combined.
- Divide batter and mix melted bittersweet chocolate into one bowl and red food coloring in the other.
- Spoon dollops of red and chocolate batters into pans and swirl together.
- Bake for about 20 minutes and check doneness with a toothpick.
- Cool cakes in the pans for 10 minutes, then transfer to wire racks.
- Frost the cooled cakes with black buttercream icing evenly.
- Drizzle melted red candy melts over the cake and add bloody bones and eyeball sprinkles.
- Slice and serve your Spooky Halloween Marble Cake at the gathering.


Leave a Reply